SVOCat is an application intended to make easier the publication of an astronomical catalogue, both as a web page and as a Virtual Observatory ConeSearch service.
Our intention is not no make it "magical" so that it makes all the work for you. We have tried to make it so that it's easier for you to learn about what is being done, to start the installation and configuration process at different steps if you wish, and to change the application if you need to do it for your case.
Requirements:
(See some technical details below)
We assume that:
and that your have your data either:
If you have the data in another format just transform it to csv. In any case, at the end of the day we will need the database table. If you already have it (or you want to create it in your own way) you don't need a csv file and you can skip some steps in the installation process.
Technical details:
We have tested the application only in Ubuntu Linux, in particular in several different installations, at least:
and some examples in this documentation are specific for linux/unix systems.
In principle, there is no reason why you need any specific distribution or any special version of the software because SVOCat does not need any specially modern feature of any of the needed software. But, just in case, we recommend you to use some Linux distribution and install the most up to date Apache+MySQL+PHP packages for that distribution (in some cases you can find them under the "LAMP" label).
Installing all the software in Ubuntu should be quite easy. You can find a lot of examples if you search in google for "Installing LAMP in ubuntu". The details can change depending on the ubuntu version and any example that we write here could become obsolete soon. But it should be as straightforward as opening a terminal and writing:
If this does not work, please, google for "Installing LAMP in ubuntu" and try to follow instructions for your specific ubuntu version.
During the installation process you should be asked for a password for the "root" user. This is not the typical unix root administrator. It's the default mysql user with all the permissions to interact with the databases. You should choose some password for that user and remember it. You can leave it empty if you wish, but then the "root" user will have an empty password and that's quite bad security.
You can also install everything in other operating systems like windows or Mac OS, but the technical details on how to install each software in those operating systems are out of the scope of this documentation.
Contact us at svo-support@cab.inta-csic.es and we will send you a gzipped tar file SVOCat.tar.gz (~ 0.5Mb).
You need to unpack the SVOCat.tar.gz in a directory within the web server.
If you have no idea about what this means or how to do it, you maybe should contact your system or your web administrator. Nevertheless, we will give you here some tips about it (most of the examples correspond to a linux installation, but you can translate them to the corresponding ones for any other system).
For instance, a typical path for the Apache web root directory is /var/www/.
You can go to some directory within that path, for instance /var/www/catalogues/ and unpack the SVOCat.tar.gz there:
First you probably need to create some directory to host the data. We call it catalogues (you can choose the name that you wish).
where you should use your own username instead of "carlos". Now the catalogues folder exists and it belongs to you.
Now you can move the SVOCat.tar.gz file to that folder and unpack it.
it will generate a directory named SVOCat containing all the files and you will probably want to rename it as you wish. For instance, let's assume that you rename it as excat2 (we will use this name in what follows, but you can choose any name that you want).
The absolute path for your SVOCat installation (the place in your computer where the files are located) will be:
/var/www/catalogues/excat2/
And, assuming that your server main URL is http://www.mylab.org, the root URL for your catalogue (the web address for accessing it) will be:
http://www.mylab.org/catalogues/excat2/
We will assume in this documentation (when we need to refer to them) that these ones are the absolute path for your files and the root url for your catalogue.
When you unpack you will get a fresh installation of SVOCat with several files and directories:

A detailed description of the most important files and folders will be given in another section.
Just in case, it's good to make sure that the Apache web server is able to read all the files in the directory where you have installed SVOCat.
In a typical linux installation of Apache, this means that you make all the files and folders readable by the www-data user and all the folders "executable" by that user. For instance, you can do:
IMPORTANT! There are two special directories: config/ and work/. Both directories must be writable by the web server. Change their permissions as needed so that it is allowed.
In a typical linux installation of Apache, this means that you make them (and their contents) owned by the www-data user and make them writable by that user.
The point is that when you configure the application with the properties of your catalogue, the files in config/ and work/ will be changed to save the new properties. And in order to be able to do that the web server must be able to write on them. If you are not able to do this, please contact your server administrator.
In general, it is a good idea to make everything owned by your user and the apache (www-data) group. At the end, if you take a look to the output of ls -la commands, you should see something similar to this:
> ls -la

drwxr-x--- carlos www-data .
drwxr-x--- carlos www-data admin/
-rw-r----- carlos www-data admin.php
drwxr-x--- carlos www-data availability/
drwxr-x--- carlos www-data capabilities/
drwxrwx--- carlos www-data config/
-rw-r----- carlos www-data credits.php
-rw-r----- carlos www-data cs.php
-rw-r----- carlos www-data dl.php
drwxr-x--- carlos www-data docs/
-rw-r----- carlos www-data documentation.php
drwxr-x--- carlos www-data files/
-rw-r----- carlos www-data home.php
drwxr-x--- carlos www-data includes/
-rw-r----- carlos www-data index.php
drwxr-x--- carlos www-data javascript/
-rw-r----- carlos www-data news.php
-rw-r----- carlos www-data other1.php
-rw-r----- carlos www-data search.php
-rw-r----- carlos www-data ssap.php
drwxr-x--- carlos www-data style/
-rw-r----- carlos www-data version.php
drwxrwx--- carlos www-data work/
|
> ls -la admin/

drwxr-x--- carlos www-data .
-rw-r----- carlos www-data check.php
-rw-r----- carlos www-data conf_admuser.php
-rw-r----- carlos www-data conf_dlink.php
-rw-r----- carlos www-data conf_fields.php
-rw-r----- carlos www-data conf_init.php
-rw-r----- carlos www-data conf_mysql.php
-rw-r----- carlos www-data conf_paths.php
-rw-r----- carlos www-data conf_phot.php
-rw-r----- carlos www-data conf_project.php
-rw-r----- carlos www-data conf_refs.php
-rw-r----- carlos www-data conf_registry.php
-rw-r----- carlos www-data conf_scripts.php
-rw-r----- carlos www-data conf_search.php
-rw-r----- carlos www-data conf_spectra.php
-rw-r----- carlos www-data conf_vo.php
-rw-r----- carlos www-data conf_web.php
-rw-r----- carlos www-data functions.php
-rw-r----- carlos www-data init_page.php
-rw-r----- carlos www-data login.php
|
> ls -la config/ drwxrwx--- carlos www-data . -rw-rw---- carlos www-data config_admuser.php -rw-rw---- carlos www-data config_dates.php -rw-rw---- carlos www-data config_dlink.php -rw-rw---- carlos www-data config_fields.php -rw-rw---- carlos www-data config_mysql.php -rw-rw---- carlos www-data config_paths.php -rw-rw---- carlos www-data config_phot.php -rw-rw---- carlos www-data config.php -rw-rw---- carlos www-data config_project.php -rw-rw---- carlos www-data config_refs.php -rw-rw---- carlos www-data config_scripts.php -rw-rw---- carlos www-data config_search.php -rw-rw---- carlos www-data config_spectra.php -rw-rw---- carlos www-data config_vo.php -rw-rw---- carlos www-data config_web.php |
In particular, permissions for config/ and work/ should be similar to what is shown for config/. And permissions for other subfolders should be similar to those shown for admin/.
We will describe here, briefly, the most important files and directories that are contained in the SVOCat installation.
You will probably want to read this at least once. In some cases just for getting an idea about what is there. But, what is more important, because you will surely need to edit a few of these files.
As a very fast summary:
index.php (the web catalogue), cs.php (the VO ConeSearch service), ssap.php (the VO SSAP service), dl.php (the VO DataLink service) and admin.php (the administration page) are the most important files and the only ones that should be accessed directly as web pages. All the others are files used by any of these ones.
home.php, documentation.php, news.php, search.php, credits.php and coverage.php implement the main functionalities in the web page and you could want to edit some of them (at least documentation).
The style directory contains everything related to the look and feel of the web page and you can (and probably want to) change some things there.
More details:
| Edit/custom |  |
The style directory includes all the files related to the look and feel of the web page (css style sheets, images, headers, footers, etc). You will surely want to edit at least some of these files to provide some "corporative" image to the web site. |
|
| Edit/custom |  |
 |
The documentation.php is a page that you must edit to include the documentation about your catalogue. It can be an html page, a series of links, you can include php code if you want... It's up to you. The docs directory is a convenient place to include documents (pdf files, images, etc) that you want to reference from the documentation.php file. The docs directory name is not hardcoded anywhere in the application. This means that you can rename it, delete it if you don't need it or do what you wish with it. |
| Edit/custom |  |
 |
The coverage folder is intended to keep the moc files that can give information about the content of the catalogue. It also contains an example about how to create these files (but it is better that you read the corresponding MOC section in this documentation). The coverage.php shows the information about these coverage files if they exist and you have configured to do so. You shouldn't need to edit this file, but you can if you want to give some other information. If you want to offer coverage information and you have created the corresponding files, just configure to show this option, put the files in the coverage folder and SVOCat will handle this. |
| Edit/custom |  |
news.php is the content that will be loaded by index.php when a user clicks in the "News" link at the menu (if you have included it in the configuration). This page will show, as default, when the catalogue was created, the last update and examples on how to access the active VO services that you have created. But you can add other entries editing this file and including other news that you want to communicate to your users. We have styled it as a series of title/text pairs but you are free to edit it as you wish. |
|
| Edit/custom |  |
credits.php is the content that will be loaded by index.php when a user clicks in the "Credits" link at the menu (if you have included it in the configuration). This page will show, as default, all the references that have been configured in the corresponding admin sections. In principle you don't need to edit this page (SVOCat should generate a good version if you have given all the information in the configuration) but you can edit it if you want to provide more (or a different) information. |
|
| Edit/custom |  |
This is in practice a placeholder just in case you want to add another custom functionality to the web page. During the configuration you can include it and define the text that will be shown in the menu for this functionality. Then you can edit other1.php and include whatever you want using html or PHP. Otherwise, if you don't need anything special, just ignore this file. |
|
| Edit/custom |  |
This is the recommended directory where to place your catalogue files if they are in csv format (see the corresponding section). You can put the files in some other place of your computer if you want, but this directory can be a good place. In a fresh installation of SVOCat we have included here the file cmc15n2-part1.csv as an example. This is only important if you want that SVOCat helps you to populate the database starting with csv files. If you want to populate the database by your own means, you don't need this directory. |
|
| Don't touch |  |
 |
The admin.php is the file that allows you to configure the application and you will have to access it using a web browser as: http://www.mylab.org/catalogues/excat2/admin.php The admin directory includes files used by admin.php. You shouldn't need to edit anything in these files. |
| Don't touch |  |
These files are here to allow external VO applications to check the availability of VO services for this catalogue. You shouldn't need to edit anything in these files. |
|
| Don't touch |  |
These files are here to allow external VO applications to find what VO services are available for this catalogue and some properties about them. You shouldn't need to edit anything in these files. |
|
| Don't touch |  |
The config directory includes all the configuration files. They should be written by the web server accordingly with the configuration that you give in the admin.php administrative application. Remember that this directory and the files in it must be writable by the web server. In principle you shouldn't need to touch anything here (with the only exception that you want to include extra functionalities, implemented by you, in the web page, as it will explained later). |
|
| Don't touch |  |
If you have your catalogue data as a csv file, the administrative application will generate some scripts to help you to create a MySQL database table and load the data into it. This directory will contain these scripts created using the information that you give in the configuration. In principle, you shouldn't need to edit the scripts but you are free to do it if you need it and you know what you are doing. In a fresh installation of SVOCat this directory will include the scripts corresponding to the "Example Catalogue" and they will be changed later by the admin application. Remember that this directory and the files in it must be writable by the web server. |
|
| Don't touch |  |
index.php is the main script for the web page. You can access it as: http://www.mylab.org/catalogues/excat2/index.php This script uses other files as needed, depending on what is requested by the user (home, search, documentation, catalogue search, etc). You shouldn't need to edit anything here. |
|
| Don't touch |  |
cs.php is the file implementing the VO ConeSearh protocol and can be accessed as: http://www.mylab.org/catalogues/excat2/cs.php specifying the adequate parameters. Read the ConeSearch section for further explanation. You shouldn't need to touch anything in this file. |
|
| Don't touch |  |
ssap.php is the file implementing the VO SSAP protocol if your catalogue includes spectra and you have configured to offer this service. It can be accessed as: http://www.mylab.org/catalogues/excat2/ssap.php specifying the adequate parameters. Read the SSAP section for further explanation. You shouldn't need to touch anything in this file. |
|
| Don't touch |  |
dl.php is the file implementing the VO DataLink protocol if you have configured to offer this service. It can be accessed as: http://www.mylab.org/catalogues/excat2/dl.php specifying the adequate parameters. Read the DataLink section for further explanation. You shouldn't need to touch anything in this file. |
|
| Don't touch |  |
home.php is the content that will be loaded by index.php when a user clicks in the "Home" link at the menu. It is also the default content. In principle, this content is generated just using the configuration that you give in the admin application and you shouldn't need to edit this file. But you can edit if if you want to add something. |
|
| Don't touch |  |
search.php is the content that will be loaded by index.php when a user clicks in the "Data Retrieval" link at the menu. It implements the catalogue search and data retrieval accordingly to the configuration given by you in the admin application. You shouldn't need to edit anything there. |
|
| Don't touch |  |
This is a directory including files defining functions used by other files. You shouldn't edit anything here unless you really want to hack the application and you know what you are doing. |
|
| Don't touch |  |
This directory includes javascript libraries that are used in the web page to implement several functionalities. It includes:
You shouldn't edit anything here unless you know what you are doing. |
|
| Don't touch |  |
This file contains information about the version of SVOCat that you are using. You shouldn't need to change anything there. |
|
When you download SVOCat you get it preconfigured with the properties of an example catalogue.
The idea is that you can get, as fast as possible, a working version of SVOCat so that you can see it at work and get tips on how to configure your own catalogue.
This example catalogue is made using a very small subset of the SpeX Prism library. We have chosen it because it allows to explain many of the SVOCat options.
We have used the name excat2 (for 'example catalogue number 2') to label files, database tables and so on.
As a very brief summary:
In the data-csv/excat2.csv file you have the data in csv format.

These data are equivalent to a table with 10 rows and 10 columns.

We need to create a MySQL table with that structure and then load the data into it (you could want to take a look at the MySQL database configuration).
First, we need a database that you must create in your own way. A typical command to create a database is:
mysqladmin -u root -p create vocats
If you decide to use other name for the database, please go to the administration application and change it too in the Mysql section.
Creating a mysql user is a little more tricky. If you don't know how to do it you should probably ask for some help from your system administrator.
In any case, we give you a simplified example.
You first open the MySQL command line interface:
mysql -u root -p
Then, under the mysql prompt, you create a user named "mycatuser" with all privileges in the 'vocats' database and password "mycatp@ss"
mysql> grant all privileges on vocats.* to 'mycatuser'@'locahost' identified by 'mycatp@ss';
and you exit the mysql interface:
mysql> quit;
But take this as just a tip. You maybe want to be more restrictive about mycatuser permissions.
We now must create a table to contain the catalogue data. In the work/ folder you have a file work/create_table.my with the mysql instructions to create a table named "excat2".
you can use this file to create the table in the database as:
("mycatuser" must be a mysql-user allowed to create a table, like the one that we created above).
You can also create the table by your own means (using phpMyAdmin, by the command line mysql interface or by any other way that you are used to). Just use the same table definition shown above.
The last step is loading the catalogue data into the table.
There are different methods that you could use to insert data into the database table.
(1) Using mysqlimport
An easy way is to use the command mysqlimport with the options already included in the file work/myimport.csh:
You can take a look to mysqlimport documentation (mysqlimport --help) to see more details or options. In this case:
(2) Inserting line by line (excat2.csv.my)
To do this you have work/excat2.csv.my which is a quite ugly file with instructions to load the data line by line:
You can use this script to load the data in the table as:
If everything has gone right, you should have now a database table containing the catalogue data. You should be able to go to:
http://www.mylab.org/catalogues/excat2/
where, remember, http://www.mylab.org/catalogues/excat2/ should be the main URL that corresponds to your installation. (if you are trying to install this in a laptop or any other computer without a real internet address, try http://localhost/catalogues/excat2/)
And search for data in the "Data Retrieval" section.
The catalogue is small. To get a results try for instance:
In order to configure the application with the properties of your catalogue please point your web navigator to:
http://www.mylab.org/catalogues/excat2/admin.php
(where, remember, http://www.mylab.org/catalogues/excat2/ should be the main URL that corresponds to your installation)
It is now when we are starting to work with your catalogue.
In a first installation you will get all the configuration sections filled with the properties of the example catalogue. You must change those properties to the ones corresponding to your catalogue.
You should also delete the file data-csv/cmc15n2-part1.csv and put there the CSV file with your catalogue data.
If you want to keep both, the example catalogue and your own catalogue, for being able to make comparisons during installation, we recommend you to install SVOCAT twice. Once in "excat2" directory (where you will have the example catalogue) and once in "excat2" directory, where you will make your own configuration with your own data. That means repeating the steps in the Download section but using a different directory.
The first time that enter the web admin page, you will be asked to choose an administrative password. Please, remember this password because you will need it in the future to log in into admin.php.
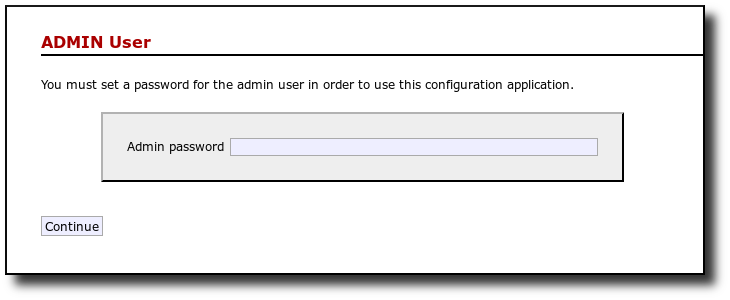
Once you give some password here you will be asked to log in using it
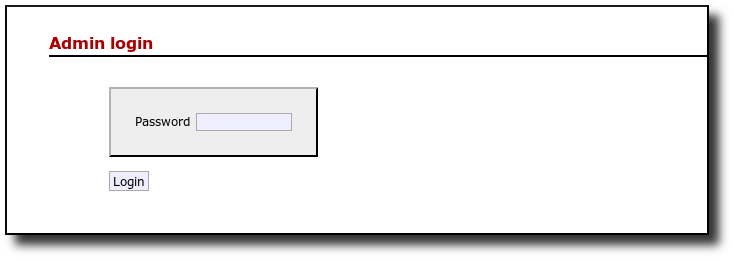
Write the same password that you wrote before and you can start configuring things.
If you ever forget your admin password, you can delete the file config/config_admuser.php. And the admin.php application will prompt you for a new password as explained above.
In this section we ask you just for a label to identify the project. It must be a single word with no blanks or special symbols. It is not used in very obvious places, but we will need it to create files and things like that.

(You can click in this image to see a larger version. Actually, if some image is not very clear in this documentation, you will usually have the option to see a larger version clicking on it)
This application uses a MySQL relational database to store the catalogue data.
We assume that you have MySQL installed in your server, you are allowed to create a database (or you can use an existing one) to store the data and you know how to do this. Otherwise, please contact your system administrator.
There are useful applications that help to work with MySQL databases, like phpMyAdmin. You can take a look at it to see if it makes your life easier. Here we will give examples assuming the simple command line interface coming with MySQL itself.
If you are used to work with MySQL most of the explanations that follow will probably be obvious. If you have never worked with it, they will probably be confusing and not enough and you will need help from somebody. We just try to give some tips in the hope that they are useful.
Just to give a naive description of concepts:
For SVOCat we need:
In our example:
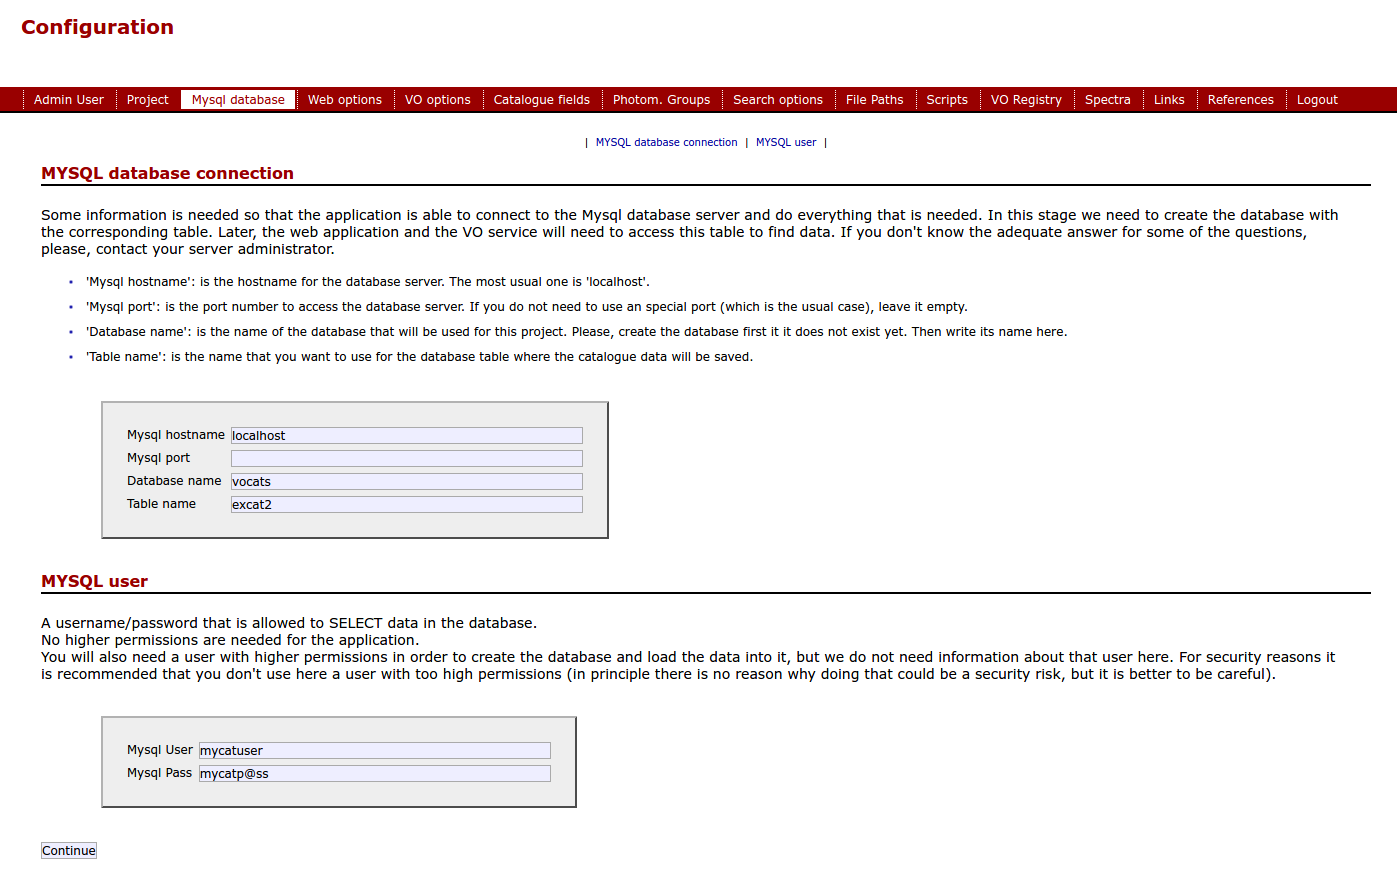
> mysqladmin -u root -p create vocats
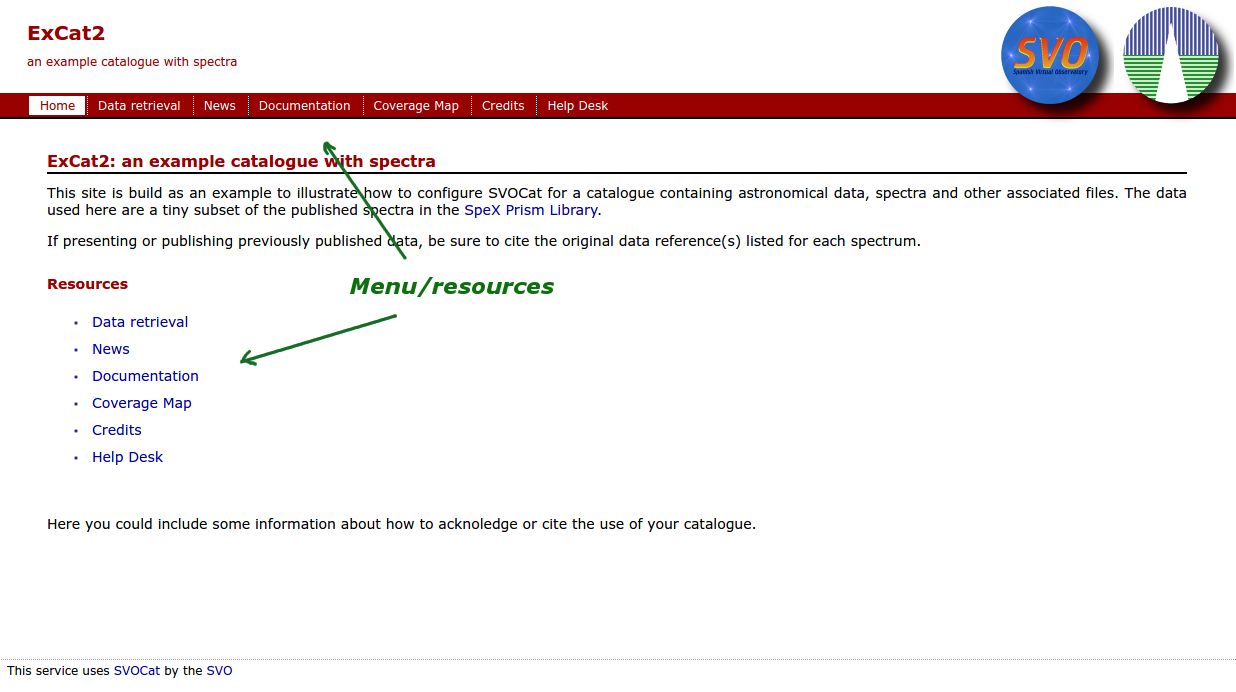
In order to generate the web page for your catalogue some information is needed about it.
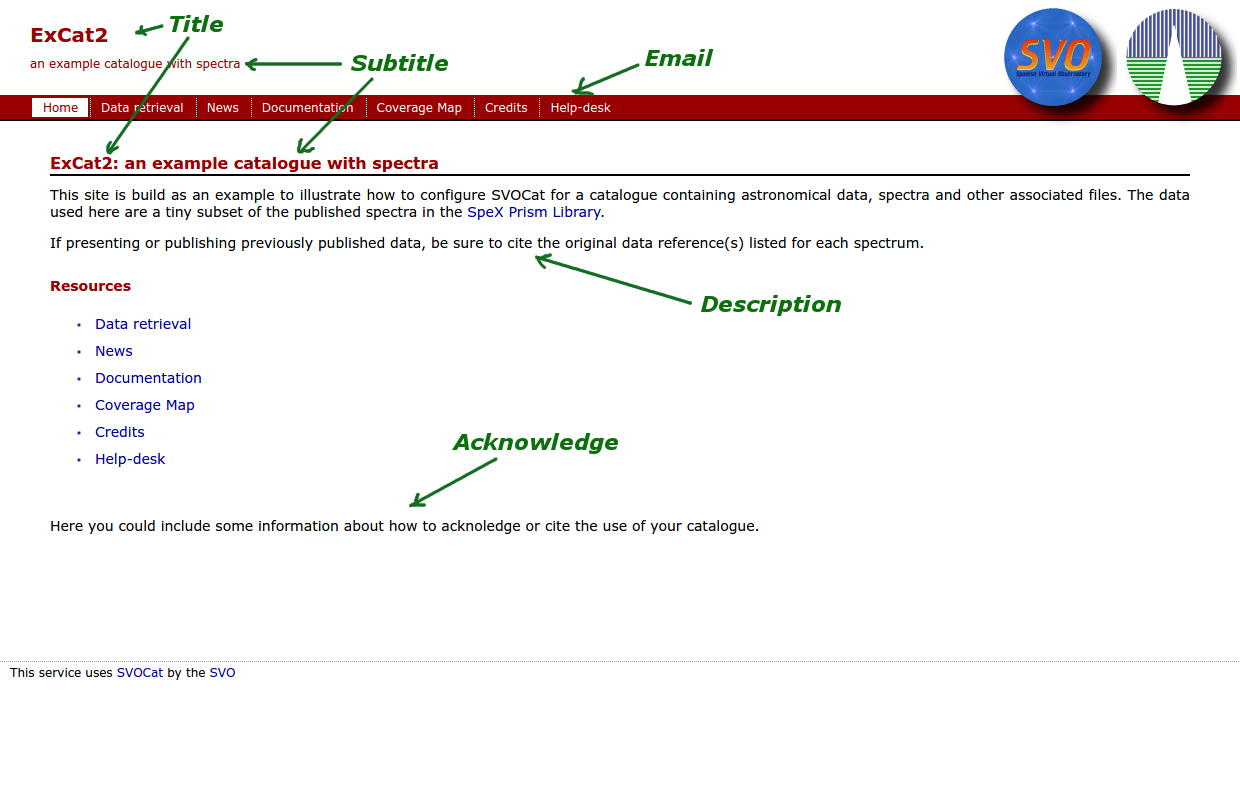
In these images we show you where these texts will be used in the web page so that you have a better idea of what you want to put there.
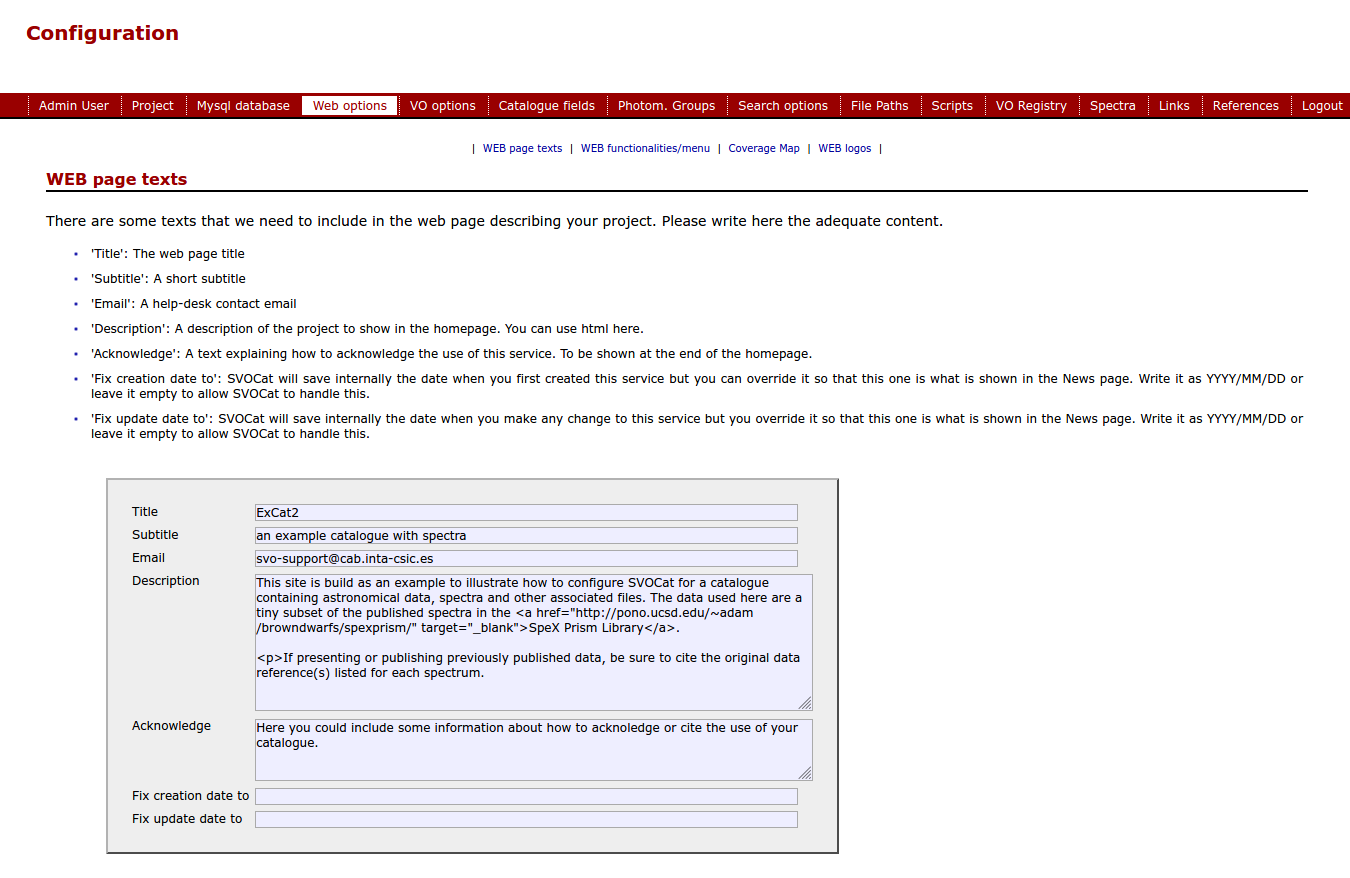
You can include html in these fields.
In fact, as you see in the image above, SVOCat will generate not only a search form so that people can see your data but a simple web portal to offer more information about it. That's why a menu is included and you can configure which items you want to show in the menu and, thus, which functionalities you want to offer.
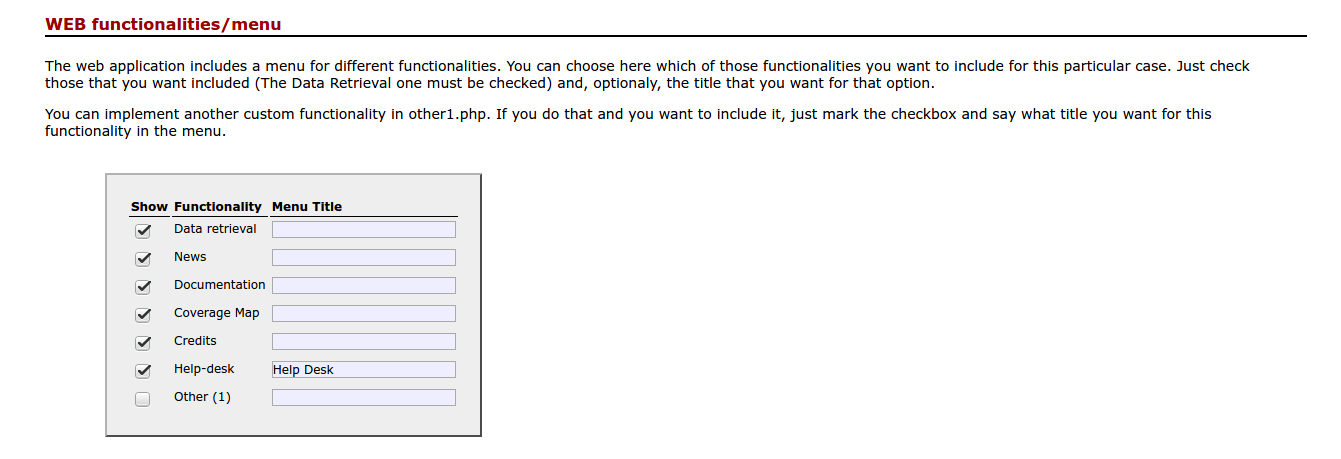
The currently available options are:
What you must do here is:
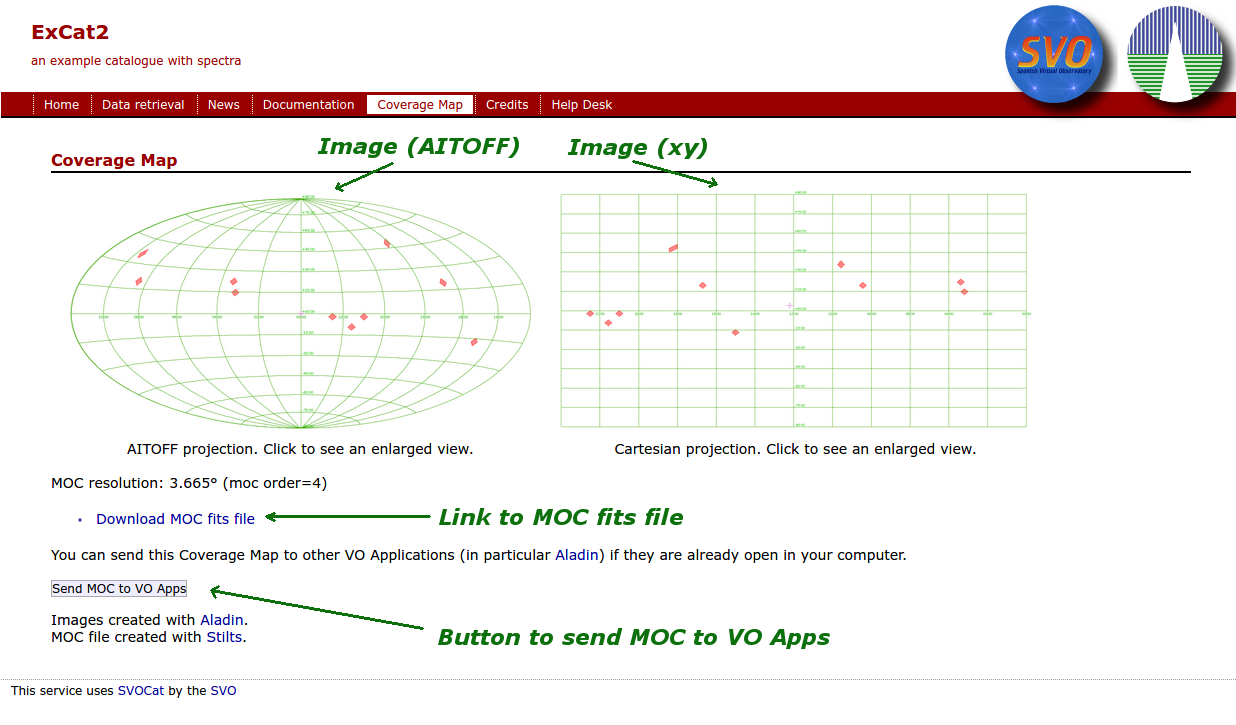
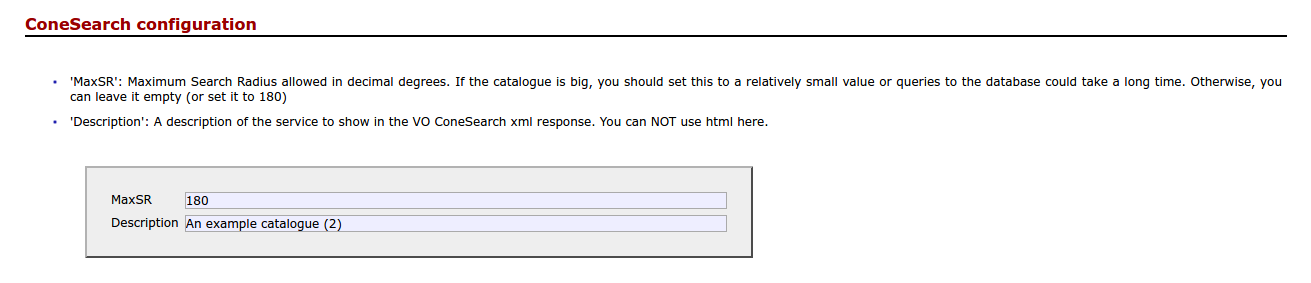
One of the available options above is including a "Coverage Map" page.
A coverage map gives a fast idea of what area of the sky is covered by your catalogue, both to VO applications and to final users (if you make a simple image displaying the coverage).
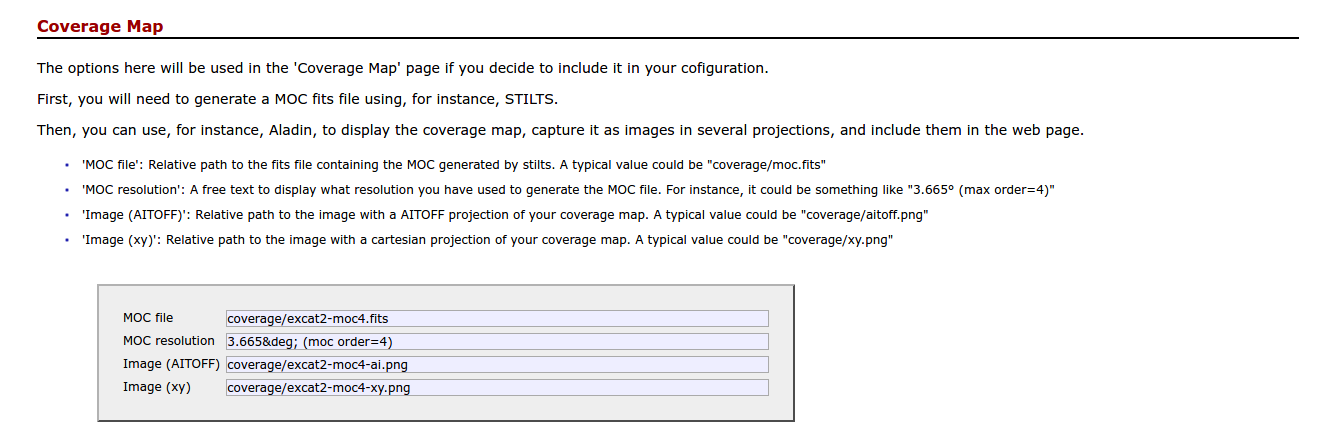
SVOCat does not help to generate the coverage map, you must do it by yourself. It only provides a simple way to display these files once you have generated them.
In order to do this you must first generate a MOC fits file. You must generate it by yourself (using, for instance, STILTS) and just write here where the location of your MOC file.
You can also generate some images displaying the coverage in a user friendly way so that we can show these images in the web page.
SVOCat expects that you provide:
A SVOCat installation includes a folder named "coverage" as a convenient place to store these files. But you can decide to put them wherever you want.
The information provided in the configuration will be automatically used to generate the "Coverage" web page, as follows:
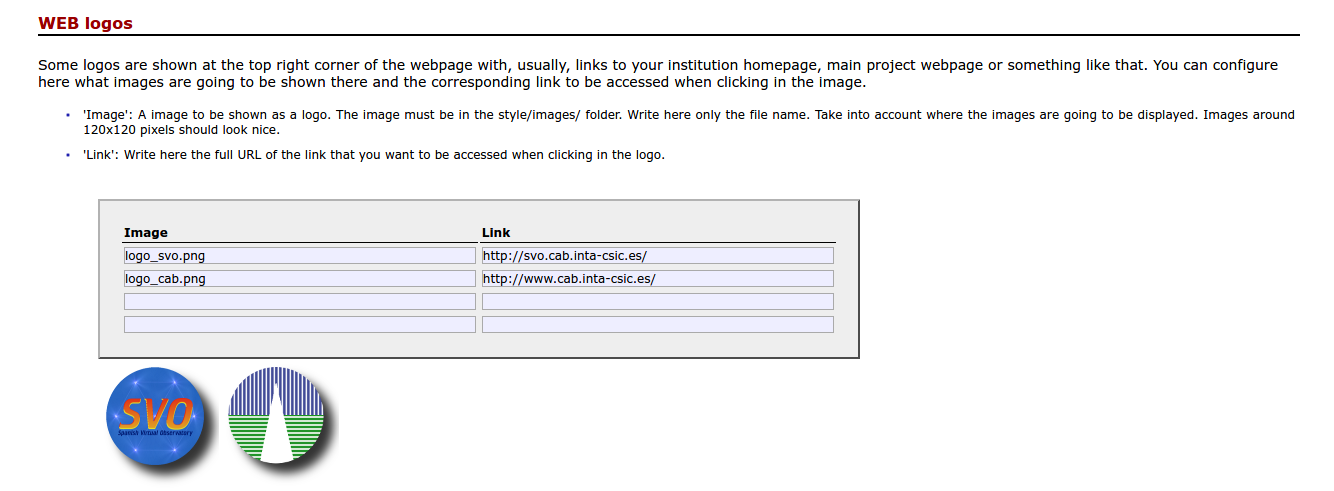
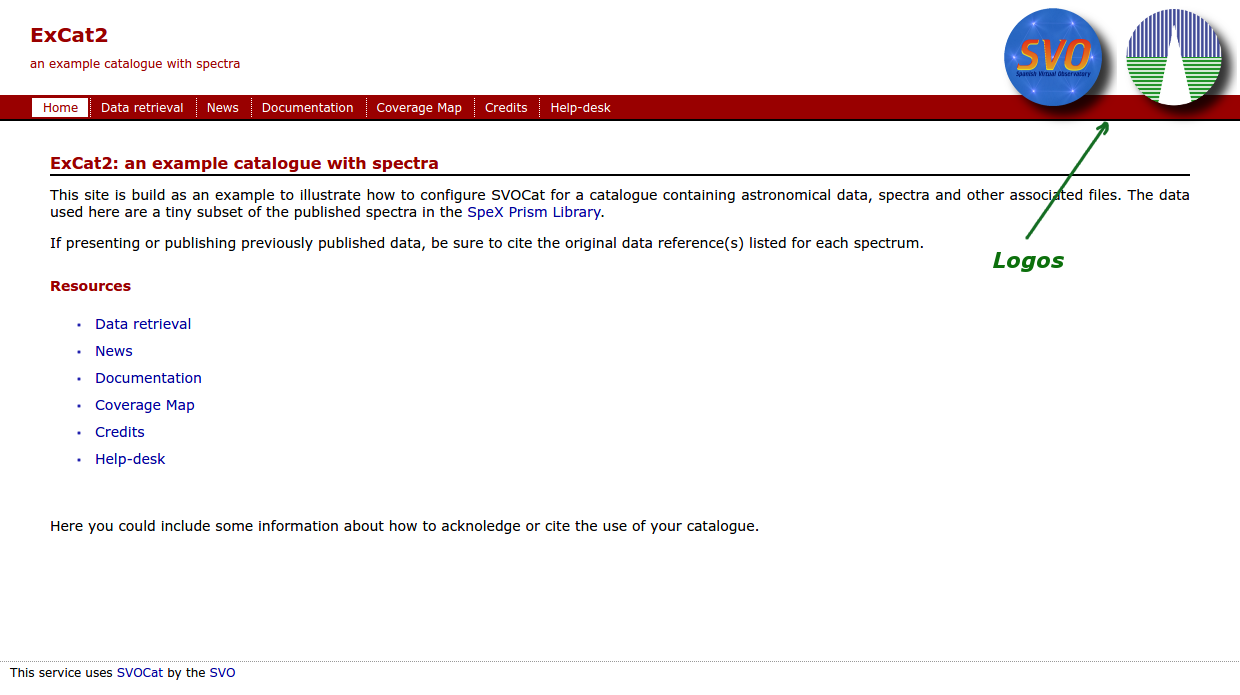
You can finally configure what logos to show in the top right corner of the web page.
We have configured this example to show our logos, but you can use your own/s.
Virtual Observatory services are usually services that respond to special http queries with a document in a particular XML format named VOTable.
In these VOTables it is important to include information about the origin of the data, authors, etc. In the configuration application a short explanation of the meaning of these fields has been given. For a better explanation you can take a look to the SSAP VO Standard (sections 4.2.5.5 and 4.2.5.6 mainly).

These fields will be used in the metadata header of all the VO query responses for this service. If, for instance, you take a look to:
http://www.mylab.org/catalogues/excat2/cs.php?format=metadata
(where, remember, http://www.mylab.org/catalogues/excat2/ should be the main URL that corresponds to your installation)
in the first lines you will see a series of PARAMS giving the information that we have written above.
Given that these values must be included in XML responses like the ones above and that XML has some restrictions about it, please, try to use plain text here (no html tags, no & symbols...).
ConeSearch is a very simple protocol that is used in the Virtual Observatory for giving information about astronomical catalogues. You could want to take a look to the Simple Cone Search IVOA specification for more details (it is a very simple protocol, so it is a good point to start if this is the first time that you read a VO 'standard' document).
As a summary, the main idea of this protocol is that it allows to search for objects in a catalogue around a given point (specified by its RA and DEC coordinates in decimal degrees) and within a Search Radius (SR) also in decimal degrees.
Thus, a typical ConeSearch query would be something like:
http://.../cs.php?RA=1.01&DEC=10.04&SR=0.1
meaning that we want objects in the catalogue around RA=1.01, DEC=10.04 (degrees) and within a radius of 0.1 degrees.
The answer will be a VOTable (special VO document in XML format) containing the info in the catalogue for objects that match the conditions.
In the version of ConeSearch implemented by SVOCat we have included additional options that allow to restrict the queries using other catalogue columns if you want to allow it. We will explain that later.
In this configuration section we only ask for very simple information:
SSAP (Simple Spectra Access Protocol) is a VO protocol designed to offer information about available spectra. You could want to read the IVO SSA standard for more information about it.
If your catalogue does not include spectra you just won't active SSAP.
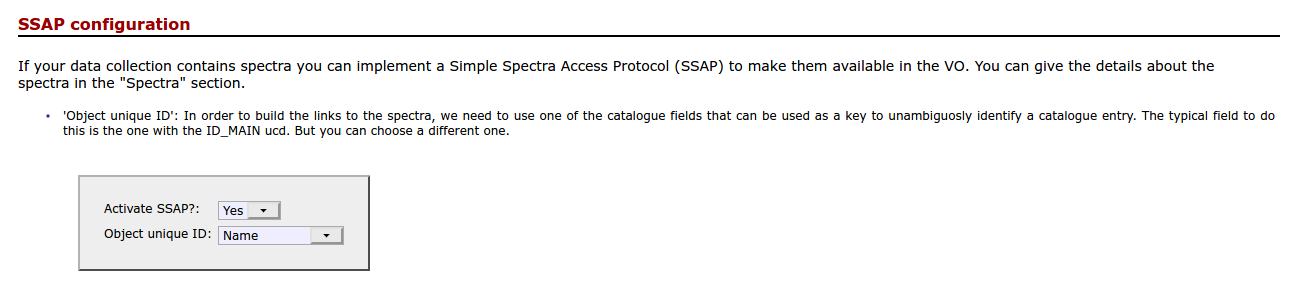
If you have spectra to offer and you want to activate SSAP you need also to choose one of the catalogue fields as 'object unique ID' (after you configure the fields) and you will also have to configure how to access your spectra and their properties in the Spectra section later.
VO applications can query a VO service about its availability. If you configure it here as "Not available" those applications that query for this information will probably not query your service for data. But take into account that this won't make you service really unavailable.
In principle, we recommend you to let this configuration option as 'Available' and don't worry about this.
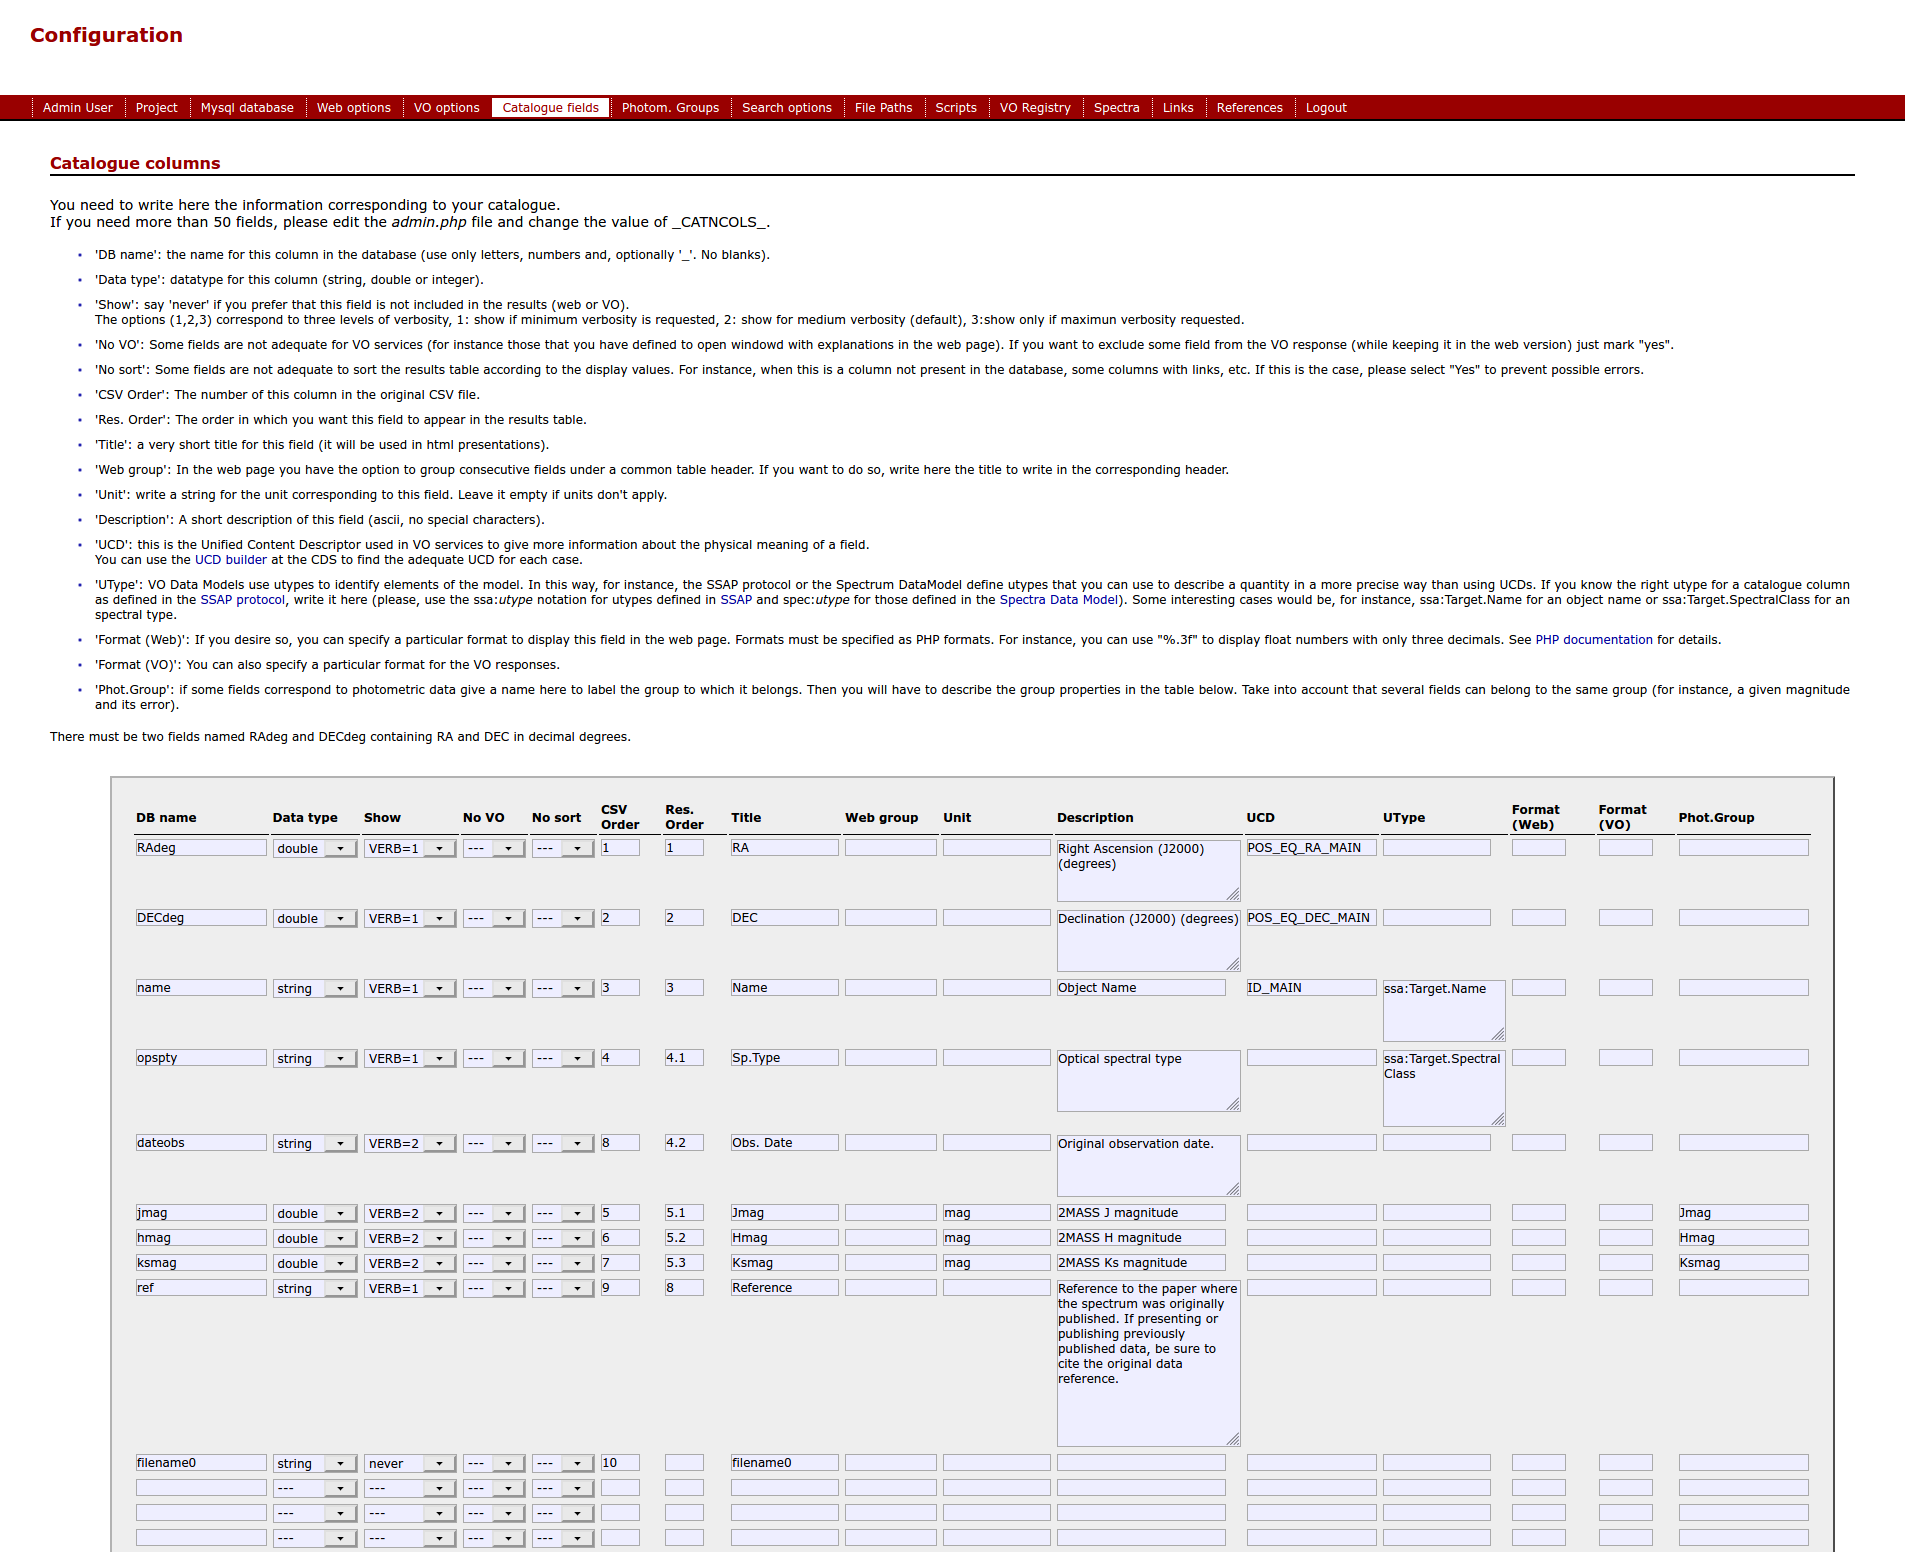
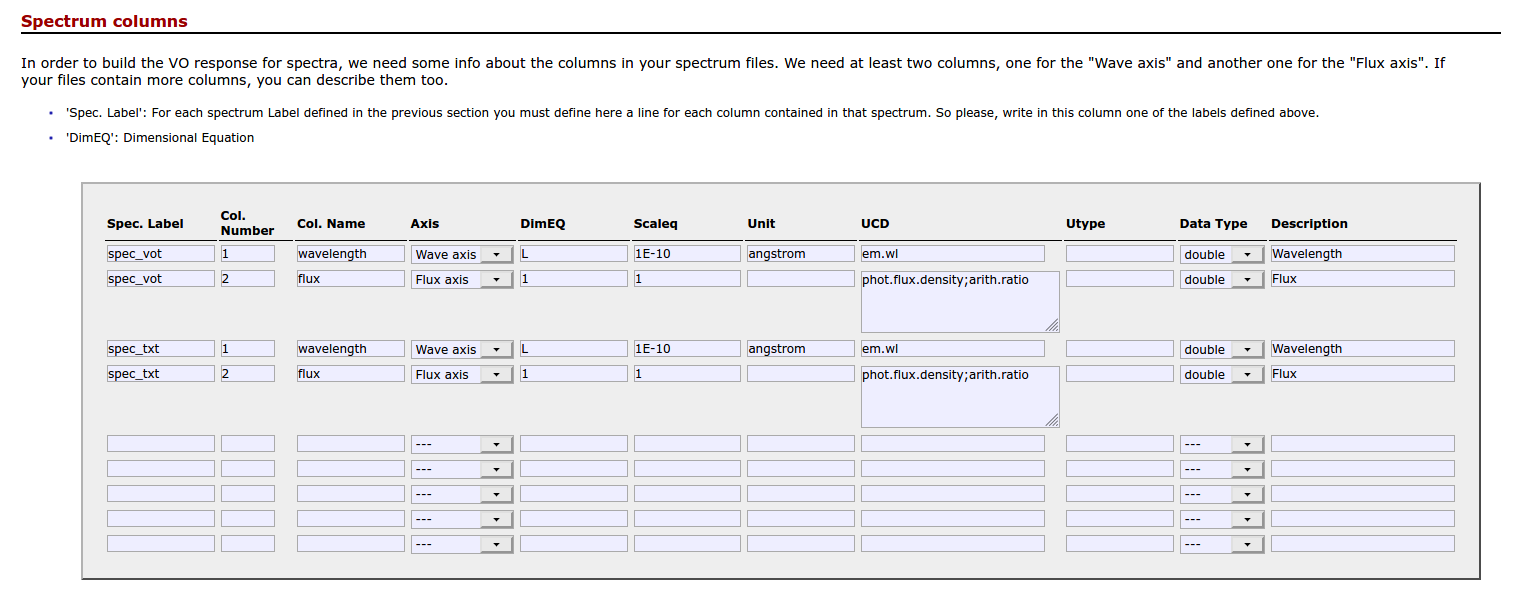
This one is probably the most important section of the configuration. And, given that you must write a lot of information, it can be the most confusing one. So we will try to explain the meaning of everything.
The main idea is that your catalogue can be seen as a series of rows (one for each observation) and columns (a column for each property of that observation).
We want that information stored in a database table with the same structure: rows and columns.
And you probably have the information in a CSV file with the information separated by commas (meaning different columns).
Here we ask you several things about the columns.
In order to explain this more clearly let's look at the example included with the distribution.
The structure of the data is:
and you have it as a CSV file like:
The idea is that there are 10 columns with different meanings. We want to know the meaning of each column (and some extra information).
IMPORTANT!. SVOCat needs that there exist two columns named RAdeg and DECdeg with the RA (Right Ascension) and DEC (Declination) in decimal degrees. In this example case they are the fourth and fifth columns and we just need to name them correctly in the configuration form.
Now let's go to the configuration form:
(Click in the image for a larger version. It will be opened in a different window)
Here you must fill as many rows as columns you have in your CSV file. That is, you have to give information about the 11 properties in your catalogue.
You can also add columns in this configuration that are not part of your CSV or the database table. In this case we have included two columns (lnk_dat, lnk_png) as placeholders to show links to datafiles. These columns will be further configured later, in the Links section.
For the other fields you can use the UCD builder at the CDS to find the adequate UCD for each case. It is not a big problem if you decide to leave this blank if you don't find a good UCD for a given catalogue property.
Here you can see the effect of some of these configuration options (but for understanding the three last columns you have to go to the Links and References sections).
Astronomical catalogues often contain information about photometric measures of the catalogued objects (usually as magnitudes). When this happens it is very useful to have as much information about these magnitudes as possible.
The IVOA Photometry Data Model specifies how to describe a photometric value (and/or the associated photometric filter) in the VO context and you could want to read it for further information.

In the configuration you must do two different things:
For each photometry group you just need to specify:
We assume here that each photometric value can be described as corresponding to one of the photometry filters available in the SVO Filter Profile Service. Ideally, this means that the observation has been made using that filter, but it is enough if you think that the observing filter is close enough to one in the Filter Profile Service.
Giving a Filter ID for the observation implies including a lot of information about the filter and, thus, about the observation (and how to understand a given magnitude/flux).
All this information about filters will be used in the web page so that when a user moves the mouse over the table header a small windows appears giving the description of each field.
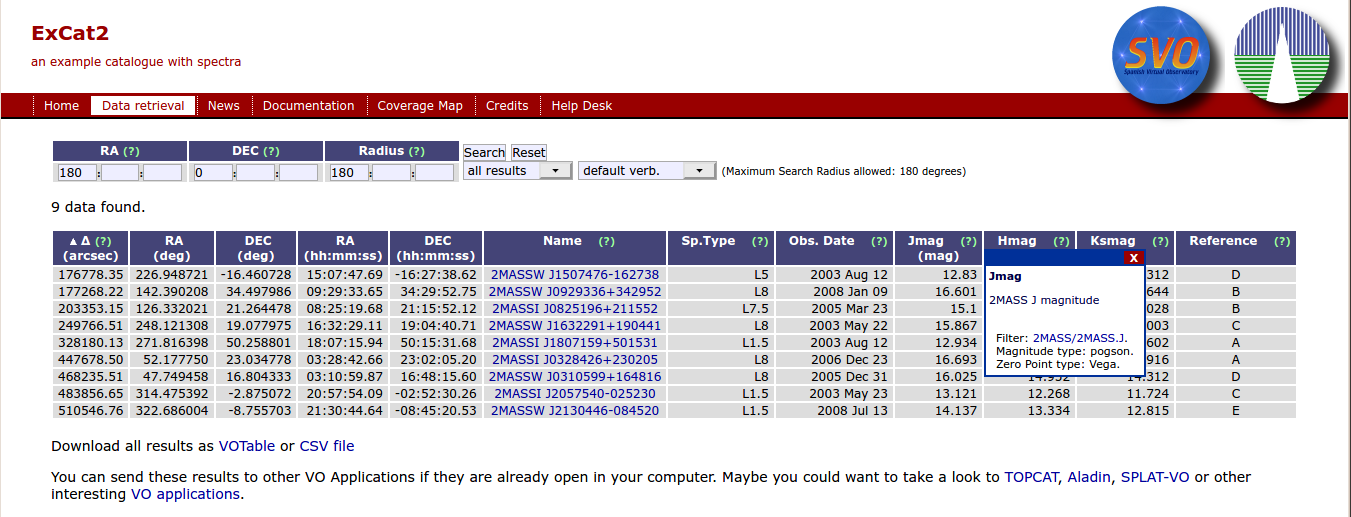
And, what's more important, it will be used in the VO ConeSearch response to include metadata groups with the fields corresponding to the same filter and the appropriate links to the Filter Profile Service's to get extra information about the filter and the adequate calibration. This allows a VO application to automatically retrieve all the data that it needs about this photometric measure. It could be a zero point to transform it to flux, a wavelength to plot the value or even the actual filter transmission curve to compute synthetic photometry to compare with the observed one.
You don't need to find that information very intuitive. It's there more for being understood by applications than for human reading. Just as a short summary, in each GROUP there are several PARAM's giving information about the group (in this case, links to the Filter Profile Service filter and calibration) and one or several FIELDref's giving the fields that share those properties.
By default the 'Data Retrieval' section of the web page will include a simple Cone Search form where users can search for catalogue entries around a given point in the sky (RA and DEC) and within a search radius (SR).

But you have the option to configure your service so that users can restrict searches using other catalogue fields.

For each field (except RA and DEC, that are always required) you can set the 'Search' column to "Yes" and it will be optionally allowed for searches.
If you mark a field as "Yes", you must also set the "Search type" and "Form Type" to specify how this field should be used.
You must set this configuration values wisely. For instance:
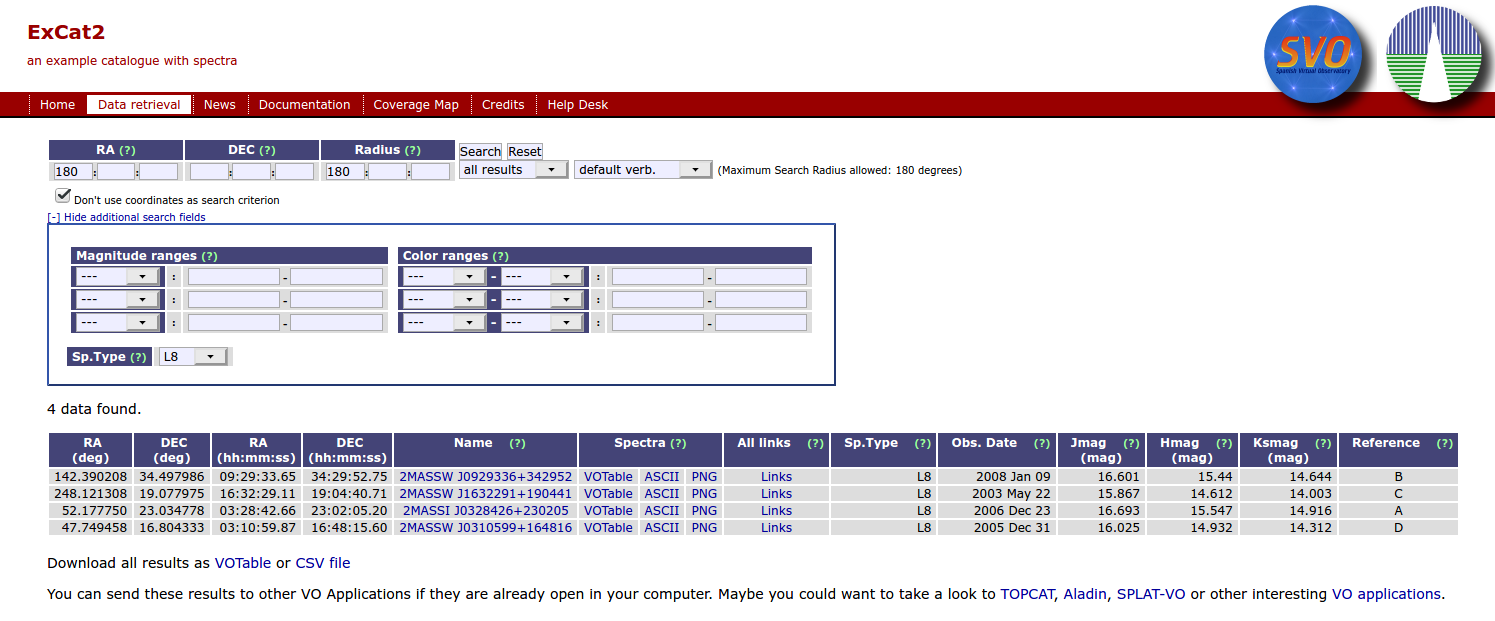
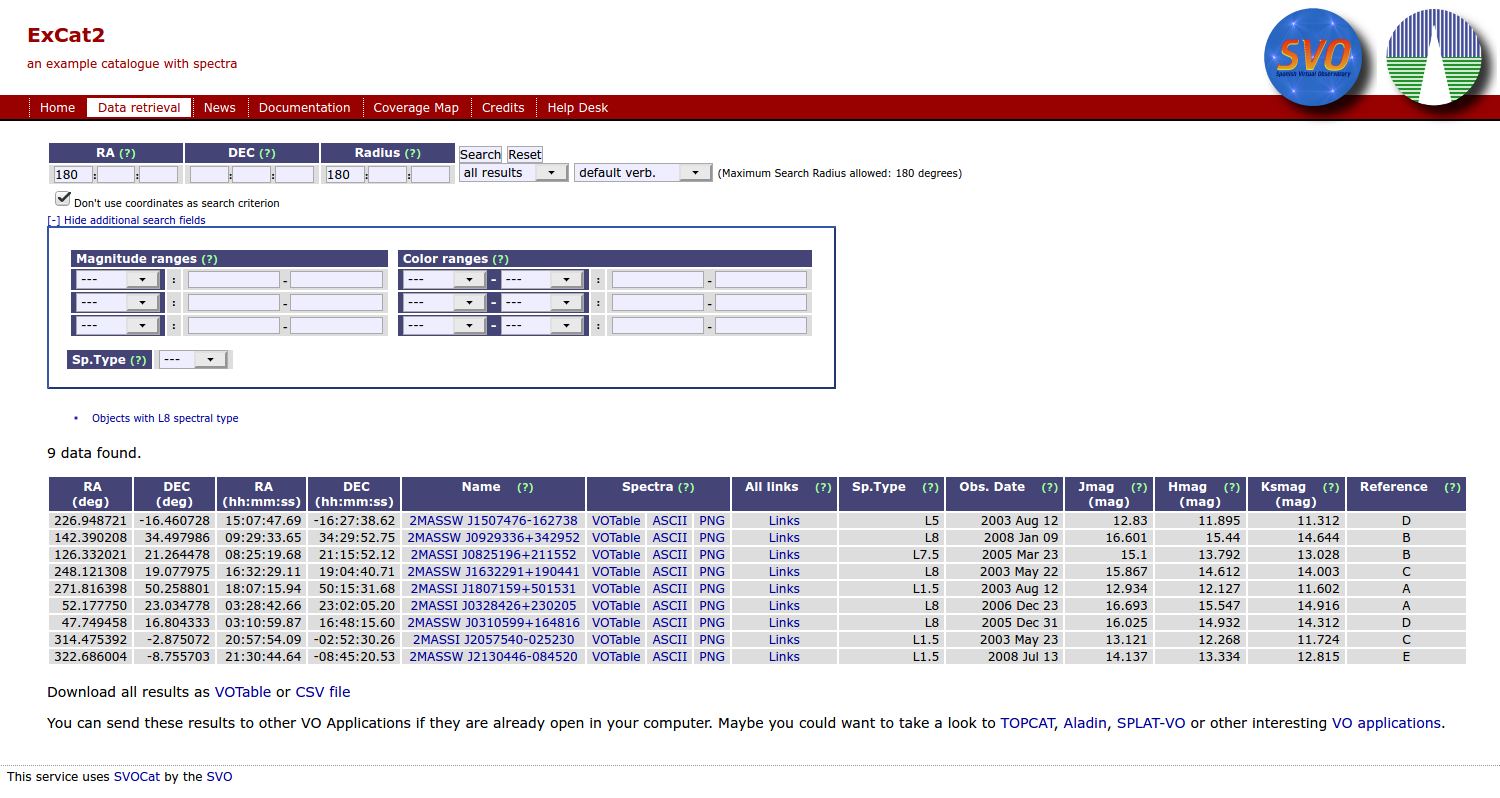
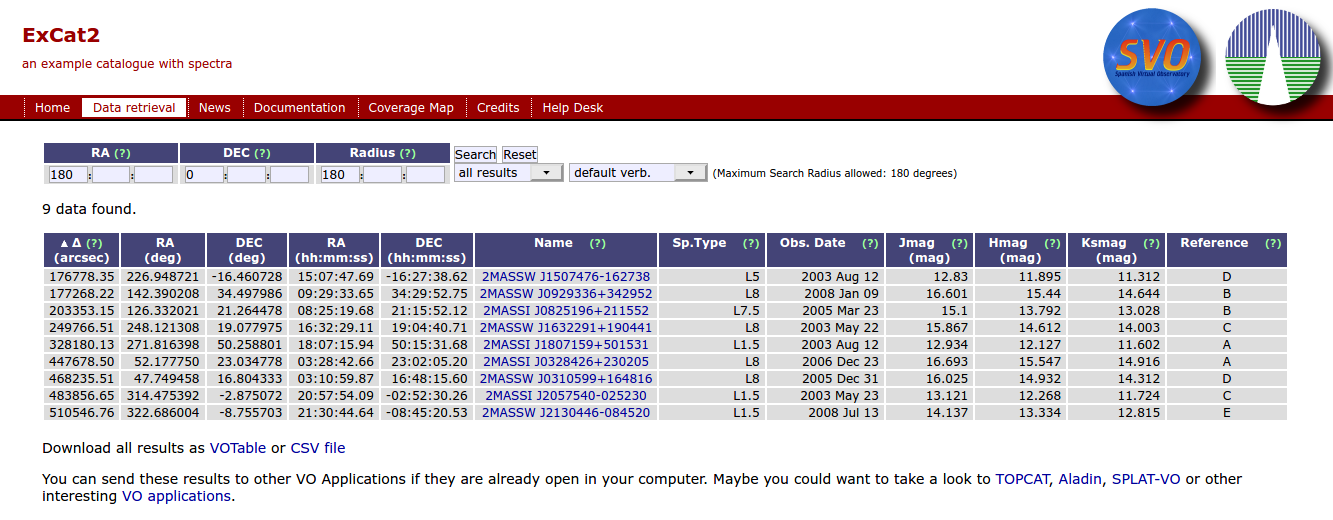
In our case we have allowed to restrict searches using the spectral type. Now the search form will show the corresponding entry for this field and users can restrict the results to those with a particular spectral type, for instance, L1.5 (just an example)::
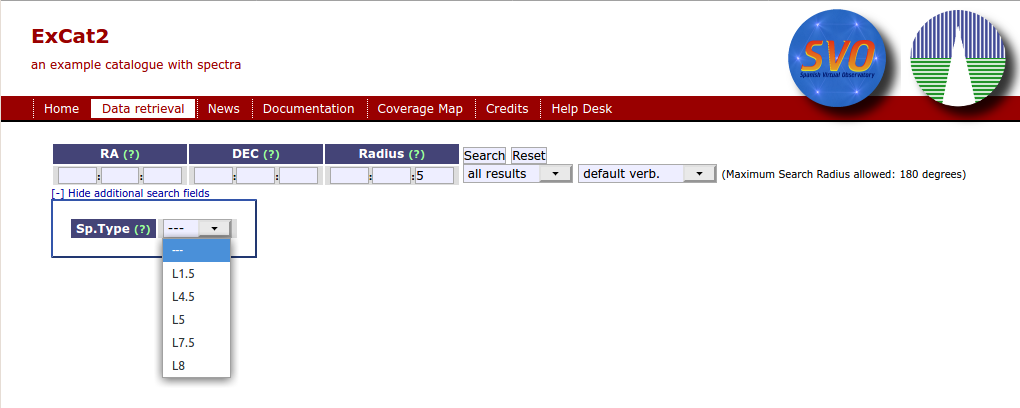
you can see that the list of results has changed. Now there are only 3 objects objects with this spectral type.

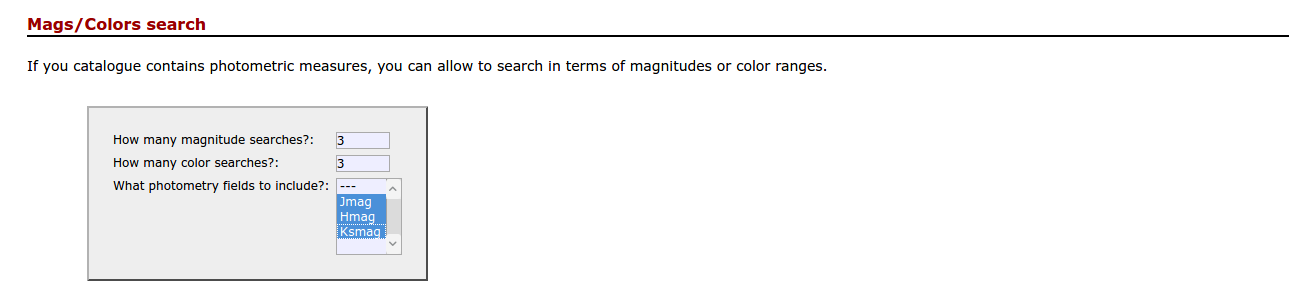
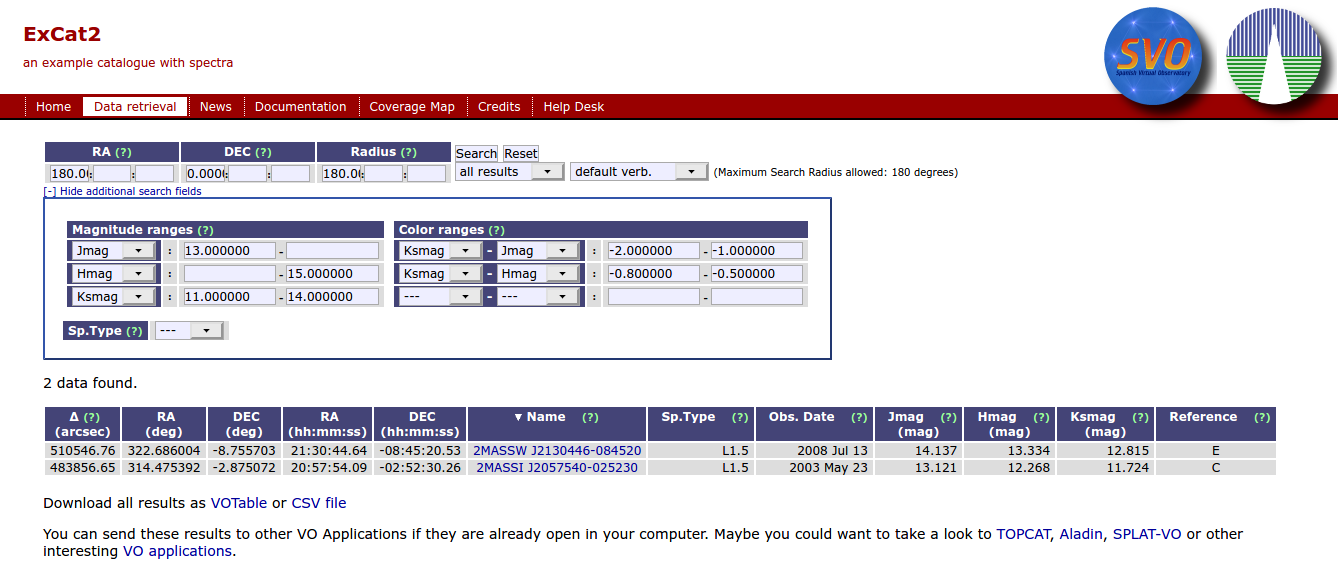
In the case that your catalogue contains photometry values, an special form can be included to search for magnitude and colors ranges.
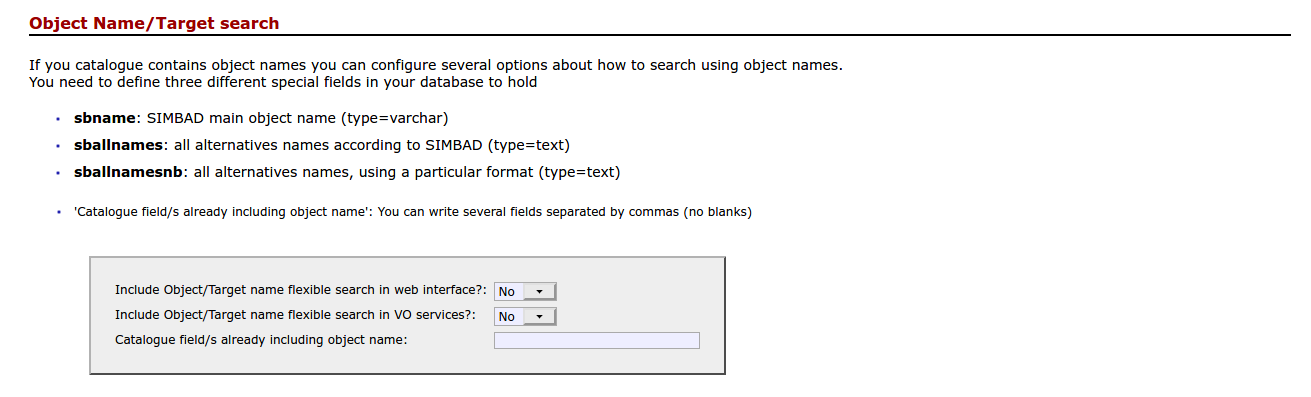
In the case that your catalogue contains astronomical objects you could want to configure special options to allow for alternative object names using Simbad information.
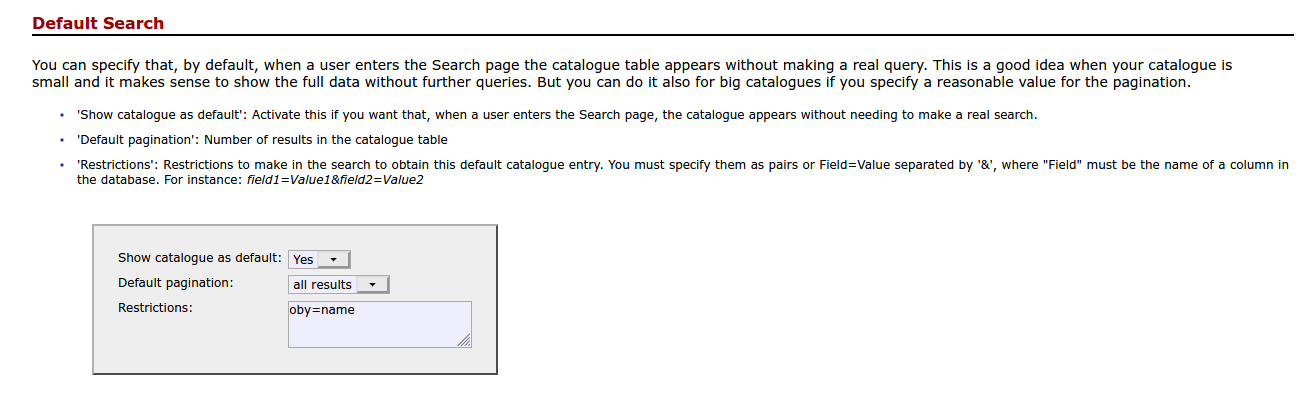
When a user first accesses the 'Data retrieval' section it is usual to show, at least, a part of the catalogue by default. This means performing a "Default search" and showing the results of this search.
You can configure here if you want to show the catalogue as default, how many results you want to show and if you want to add some restrictions to the default search.
In our example catalogue, that is very small, we have chosen to show all the results sorted by the object name (oby=name).

But you can include more restrictions. For instance, you can ask to show only entries with L8 spectral type:
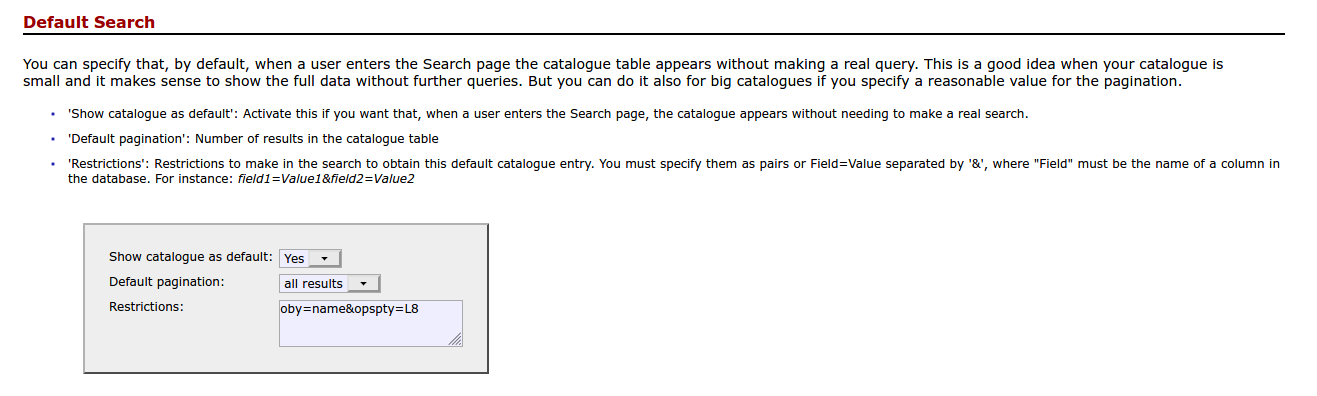
and the default result would include that restriction:

In this section you can allow to make searches without using RA,DEC coordinates. This is necessary for catalogues that do not contain RA,DEC and is also useful for catalogues where you expect that the most interesting queries will be made in terms of other columns.

In the search page you can specify some special listings for catalogue entries with certain properties. These will appear as links so that, when the user clicks on of them, a search will be done and the corresponding results will be shown. To do this you must specify the text that will appear highlighted and the restrictions in terms of the database fields (only for database fields that have been configured above as available for search, that is, in this case, the spectral type (opspty).
In our example catalogue this does not make much sense because it is very small. But we could, for instance, define a link as:
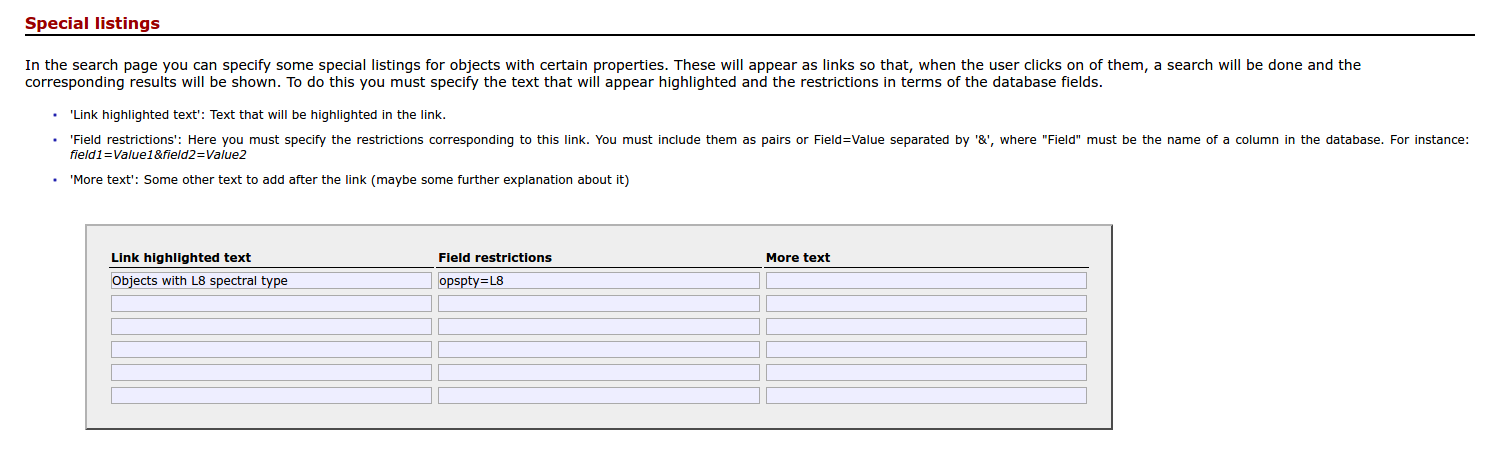
That, if clicked, would produce a list of objects with spectral type = L8.
Although the VO ConeSearch protocol only specifies that RA/DEC/SR must be the search criteria, it does not forbid to restrict searches using other catalogue fields.
In our particular implementation of ConeSearch all the search restrictions that are allowed for the web page are also allowed for the ConeSearch queries.
In order to make these options public, we have implemented a 'format=metadata' option in the same way as it is specified in the SSA protocol:
http://www.mylab.org/catalogues/excat2/cs.php?format=metadata
(where, remember, http://www.mylab.org/catalogues/excat2/ should be the main URL that corresponds to your installation)
There, among other things, the list of parameters allowed for queries are specified in the usual fashion (and the available range or list of possible values when appropriate).
so that valid queries to the catalogue ConeSearch service could be, for instance:
depending on how the user wants to restrict the query.
In principle, this section is only important if you are going to populate the database starting with a CSV file and you want SVOCat to generate scripts to make it easier for you.
If this is the case you only have to write here the computer path to the folder containing the CSV file or files (if there are several .csv files in that folder, all of them will be considered).
By default the .csv files should be in the "work/" folder in your SVOCat installation. When you download and unpack SVOCat you will find a file excat2.csv in that folder. But you can put the files in a different folder and write its full path here.
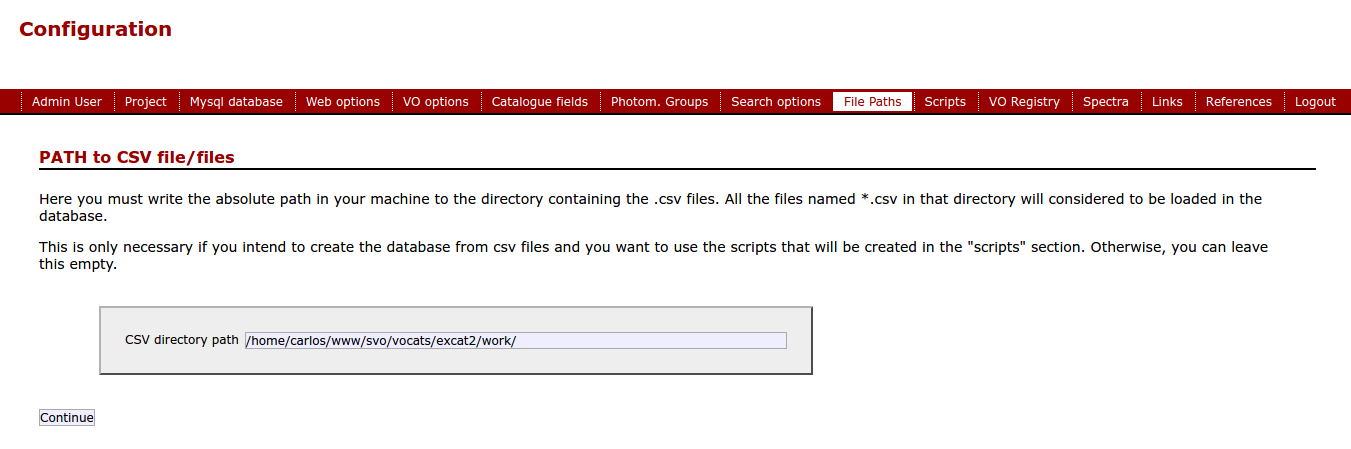
(in this case, the value for the path is somewhere in my computer, you should change it to somewhere in YOUR computer).
Remember that this path (and the .csv files in the directory) must be readable by the Apache web server. We recommend you to put the csv files in the work/ directory that comes with the SVOCat distribution.
If you have created the database by your own means, you can ignore this configuration section.
In practice you don't need to configure anything here.
This configuration section is there so that you can click on the "Create scripts" button whenever you want and the scripts in the "work" folder will be generated again taking into account any changes that you have made in other configuration sections.
These scripts intend to be useful to help you to create and populate the database with your catalogue data starting with your csv file/s. If you want to create the database and populate the database table by your own, you can ignore this configuration section.
If you want to use the scripts you can do as follows:
If you understand a little SQL you can read the file. If not, in summary, it deletes the table named "excat2" (or the name given by you in the "Mysql database" configuration section) if it already exists and then creates the table again using the information about the fields given by you in the "Catalogue fields" section.
Typically you can use this file as follows:
> mysql -u mycatuser -p vocats < work/create_table.my
Typically you can use this file as follows:
> csh /var/www/catalogues/excat2
> csh work/load_data2.csh
This will generate a XXX.csv.my file for each of your XXX.csv files.
> mysql -u mycatuser -p vocats < XXX.csv.my
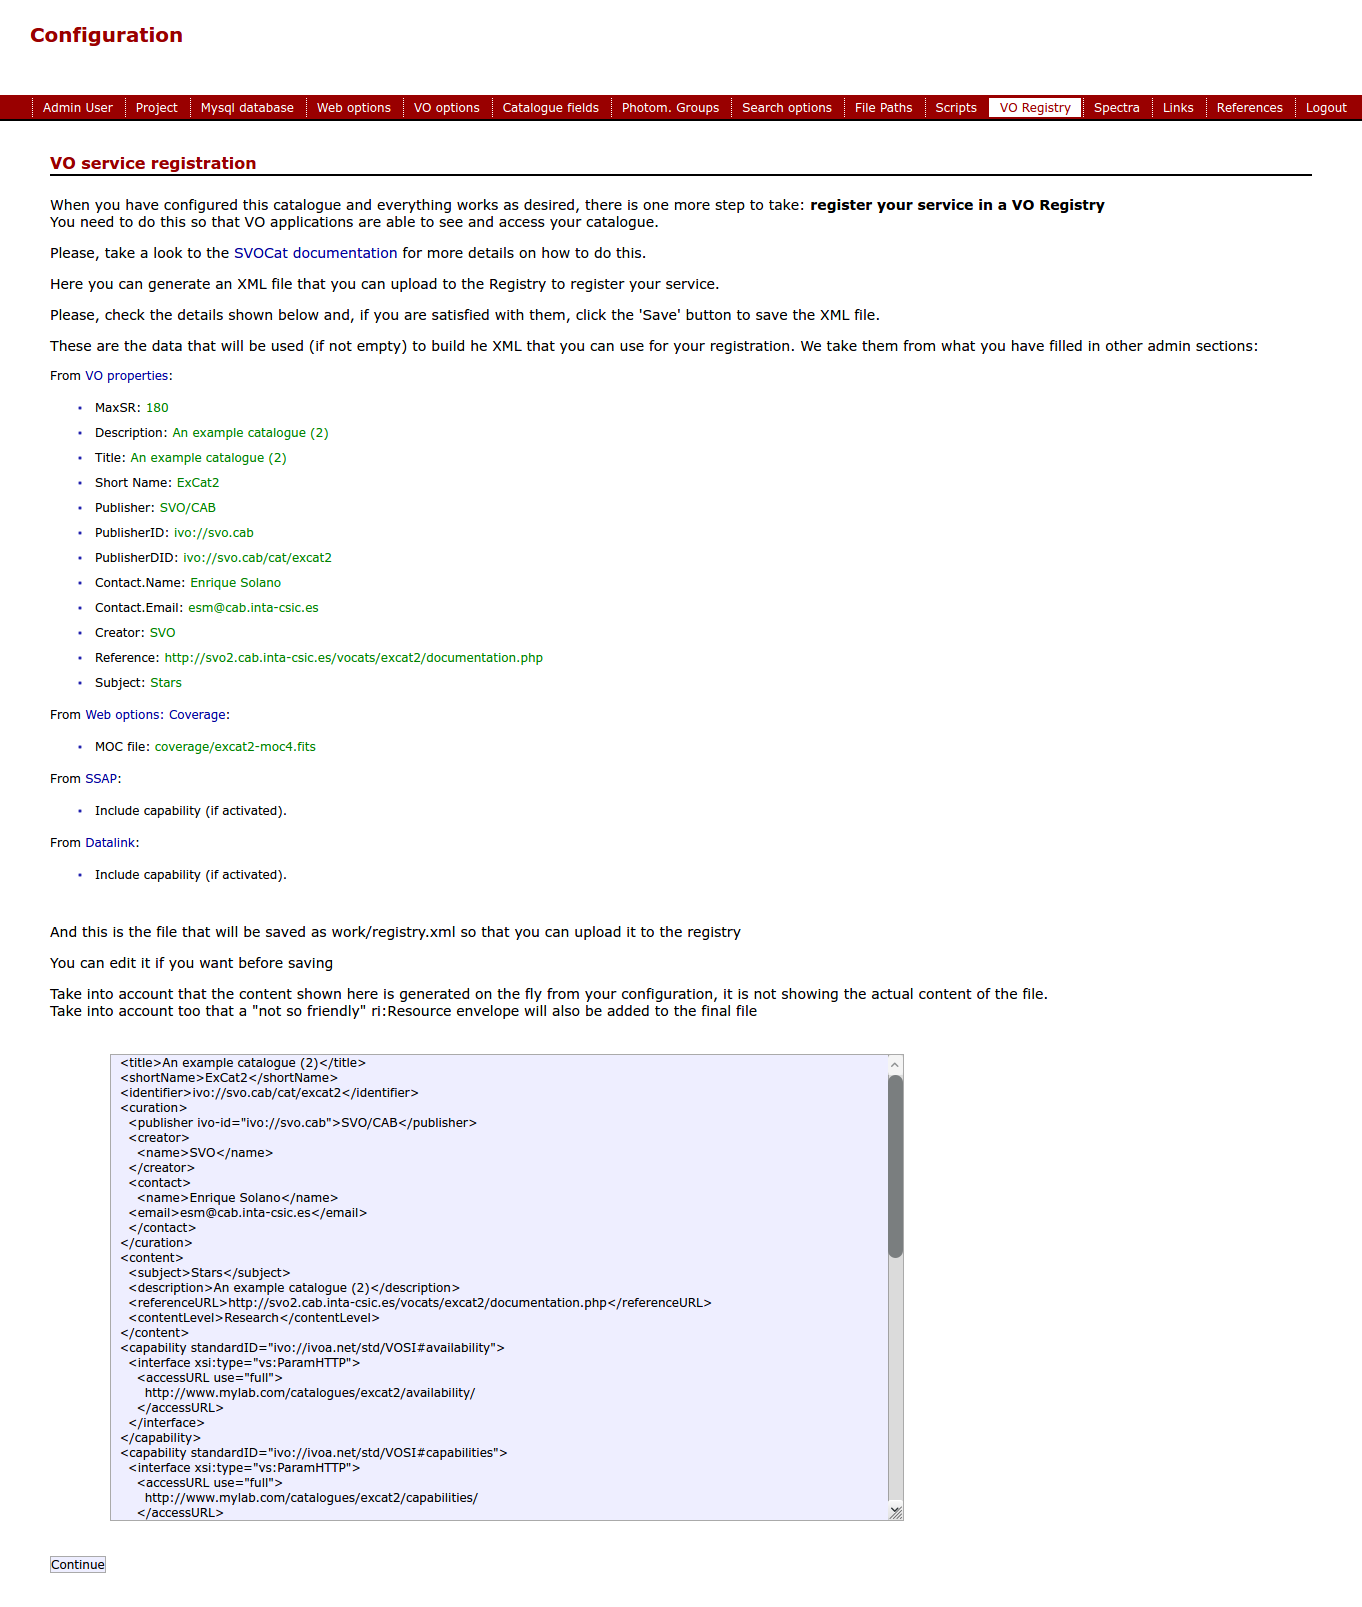
In order to register your service you have to go to a VO Registry and fill a form or upload an XML file with your service record.
In this configuration section we use the information that you have provided in other configuration sections to build an XML file that you can upload to a VO Registry to register your service more easily.
You need to check all the details, then click on 'Continue' and a file will be created in your "work/" folder named registry.xml. And you will see a "Download it" that you can also click to retrieve the file.
Once you have done this, in order to register your service you have to:
(Please, take into account that the image captures shown below correspond to the current version of the EURO-VO Registry but they could be outdated when you try to access the registry. We hope that, if this happens, this explanation is still useful for you in essence).
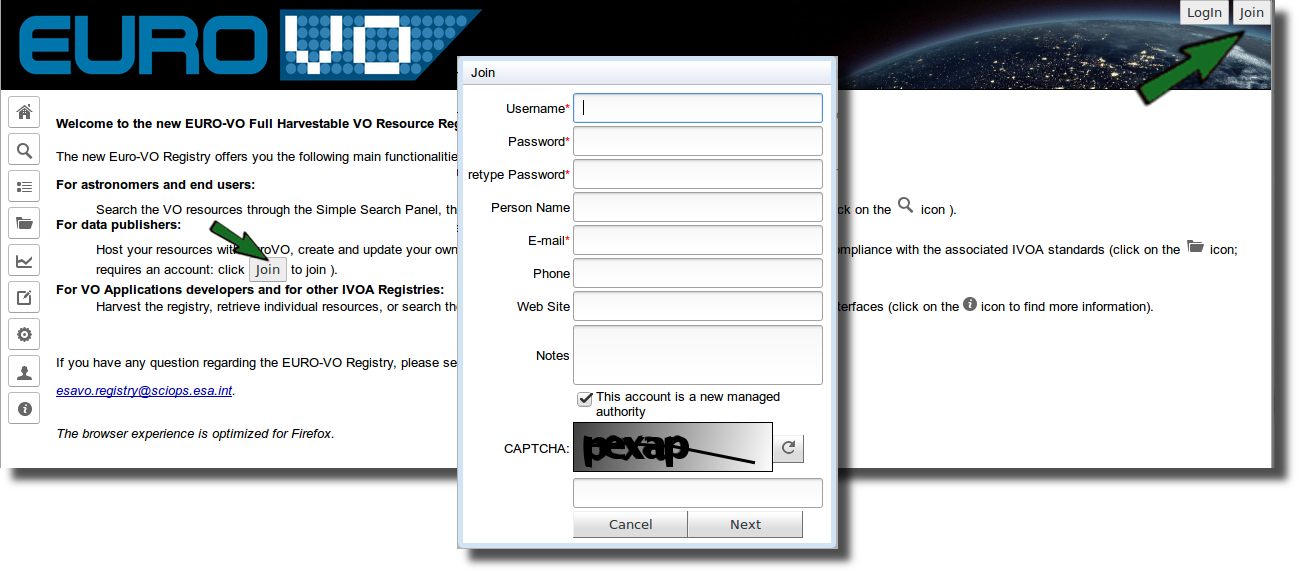
Use the same values that you have written in the 'VO Curation' configuration
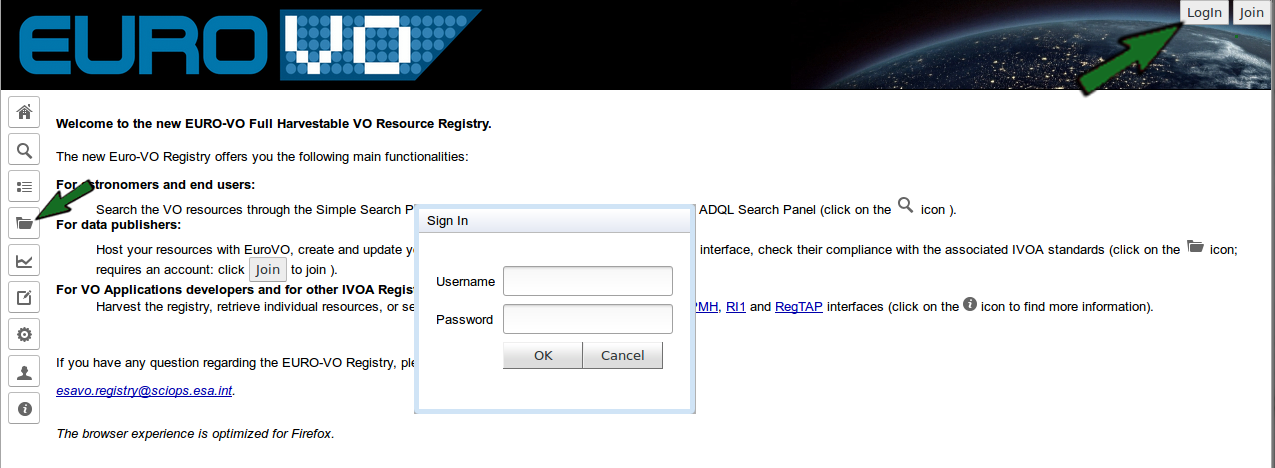

Here you can choose to use a wizard to create a minimal resource. But SVOCat builds a full xml file that you can upload to the registry to finish the process. So it's easier to select that option.

You should see a message commenting the creation of the new resource. If you get some errors, please, solve them (edit the corresponding configuration and create again the registry.xml file) and submit the file again.
Some astronomical catalogues offer spectra either as the main product (as in spectral libraries) or together with other object properties.
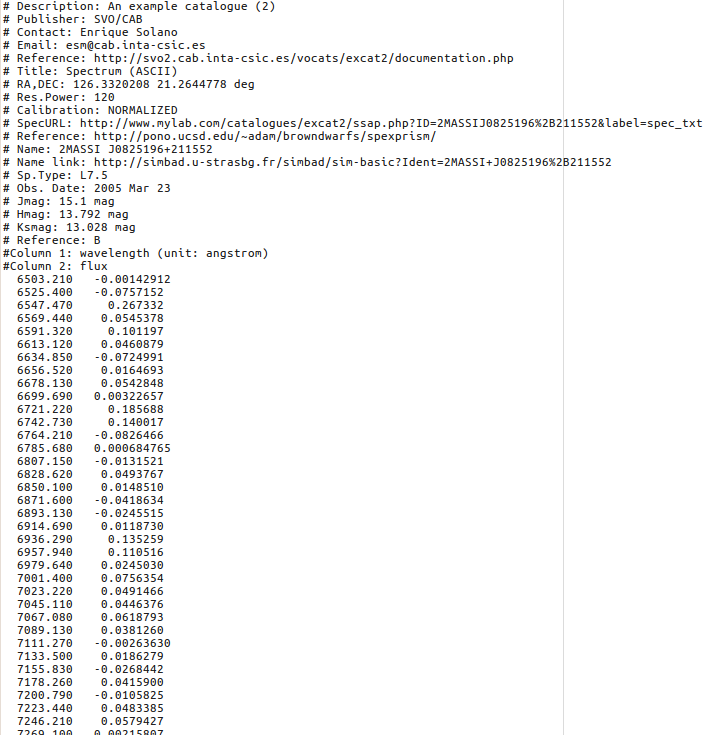
In our small example catalogue we have one spectrum for each object. Each spectrum is an ascii file with two columns:
For each spectrum we have a PNG file with a plot of the spectrum.
The name of each file is $filename0.txt for the ascii spectrum and $filename0.png for the plot. All the files are in the spectra folder.
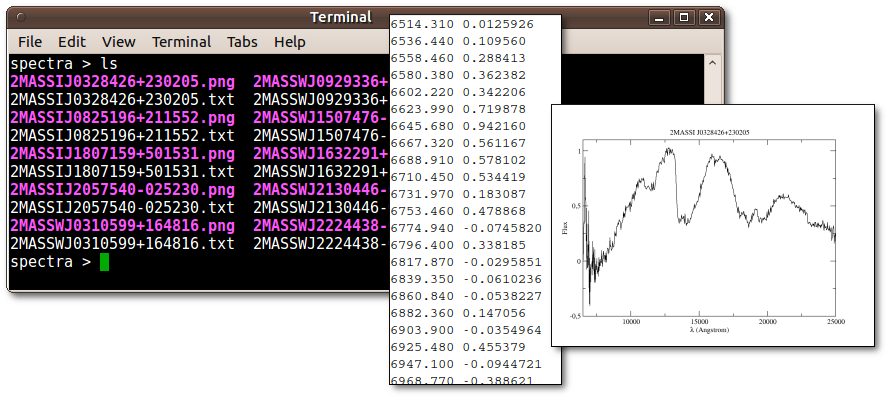
where $filename0 is the object name without blank spaces and we have kept these names in the "filename0" column of our database table.
First, we need to tell SVOCat what spectra we want to offer, how to get the original files and what formats we want to make available.
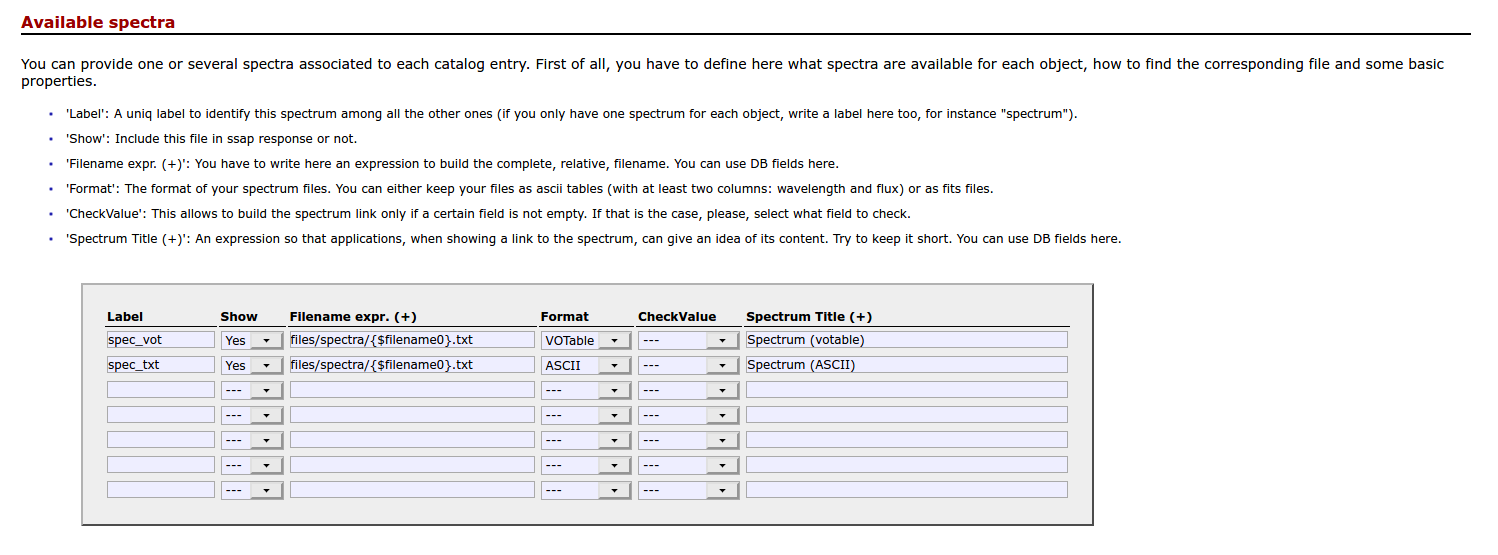
For each of these spectra, we should give information about some important properties (if we can).

and, what is even more important, describe the spectrum columns, units, etc.
Once we have all this, the right URL to access one spectrum would be, for object "2MASSI J0328426%2B230205":
and the SSA implementation in SVOCat will generate the right output in the specified format (VOTables will be generated from the original ascii files).
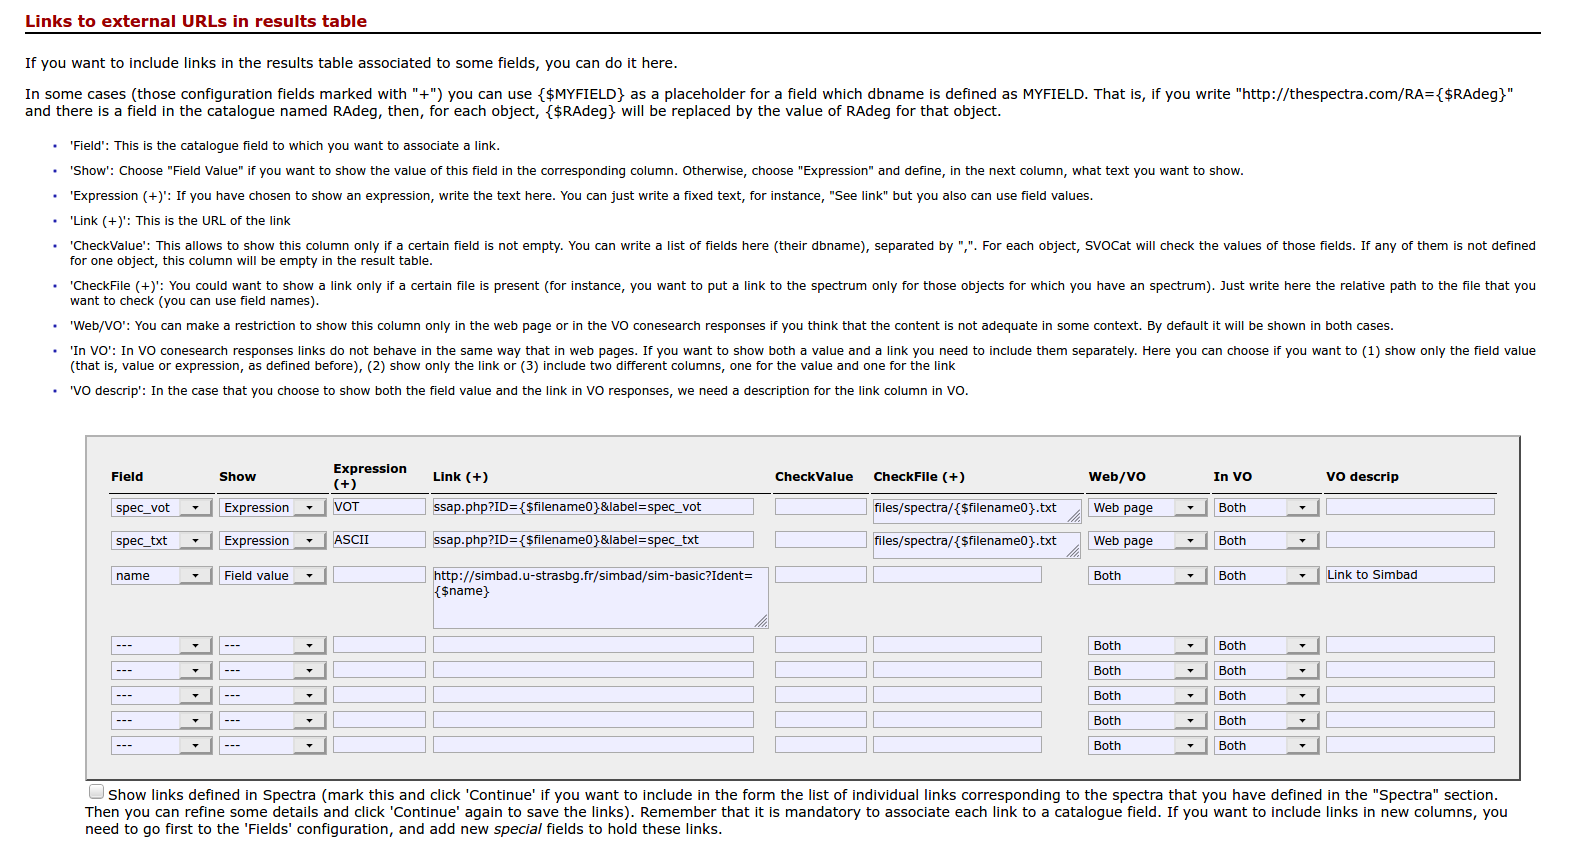
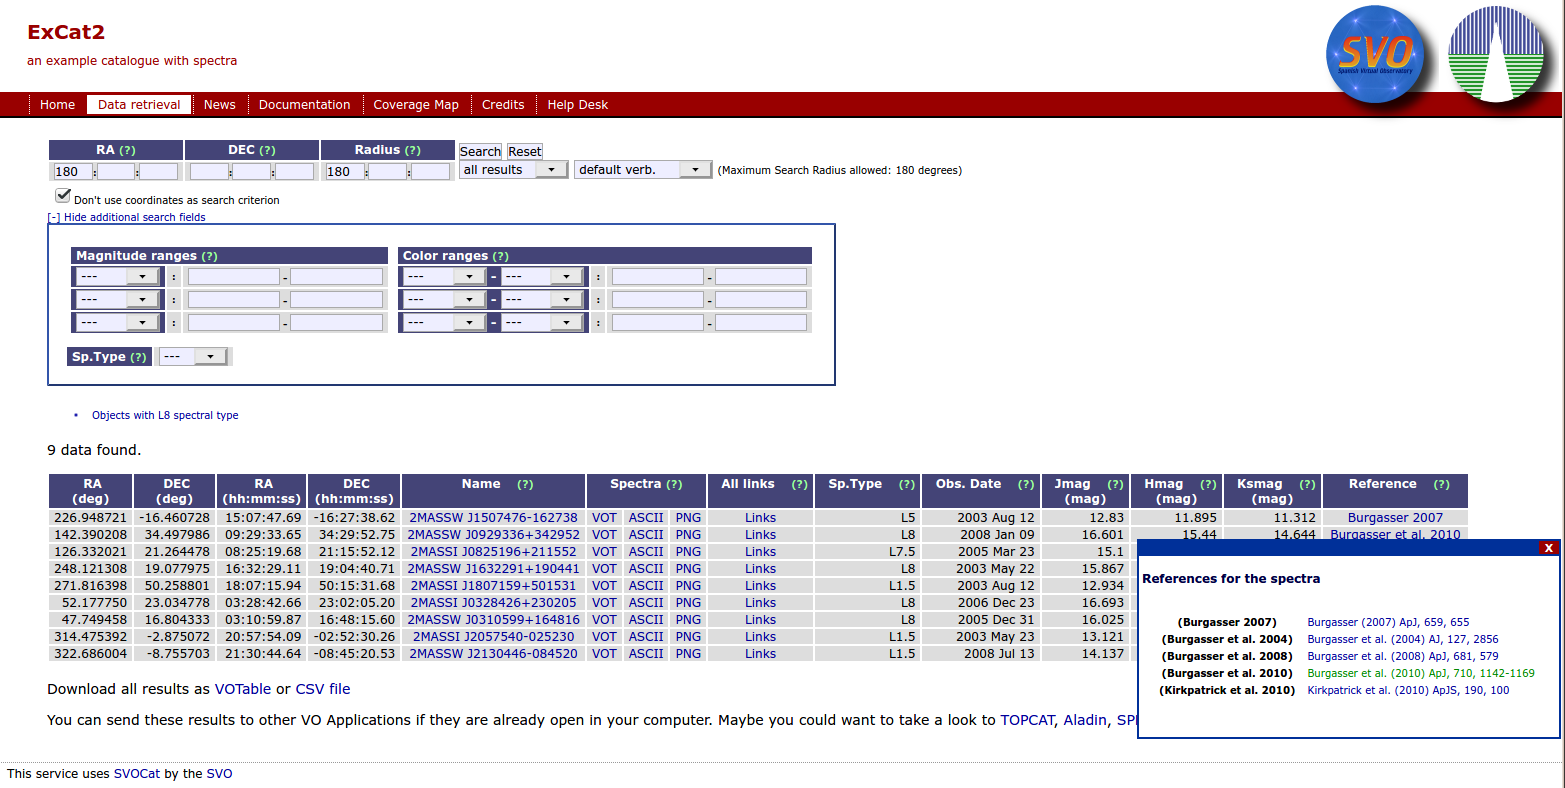
You can add links to any column in the results table. In some cases, you can even include columns only to contain links.
In our example we are going to want to include several types of links:
By now:
and later we will also include:
To do this we need to configure 4 new "special" columns in the fields configuration so that we can include links in those columns. These ones do not correspond to any database field, they are just placeholders for the links.


(we have configured the "spec_vot" column as be shown never by now, so it doesn't appear in the web page).
Now we go to the links configuration to configure how to show these links.
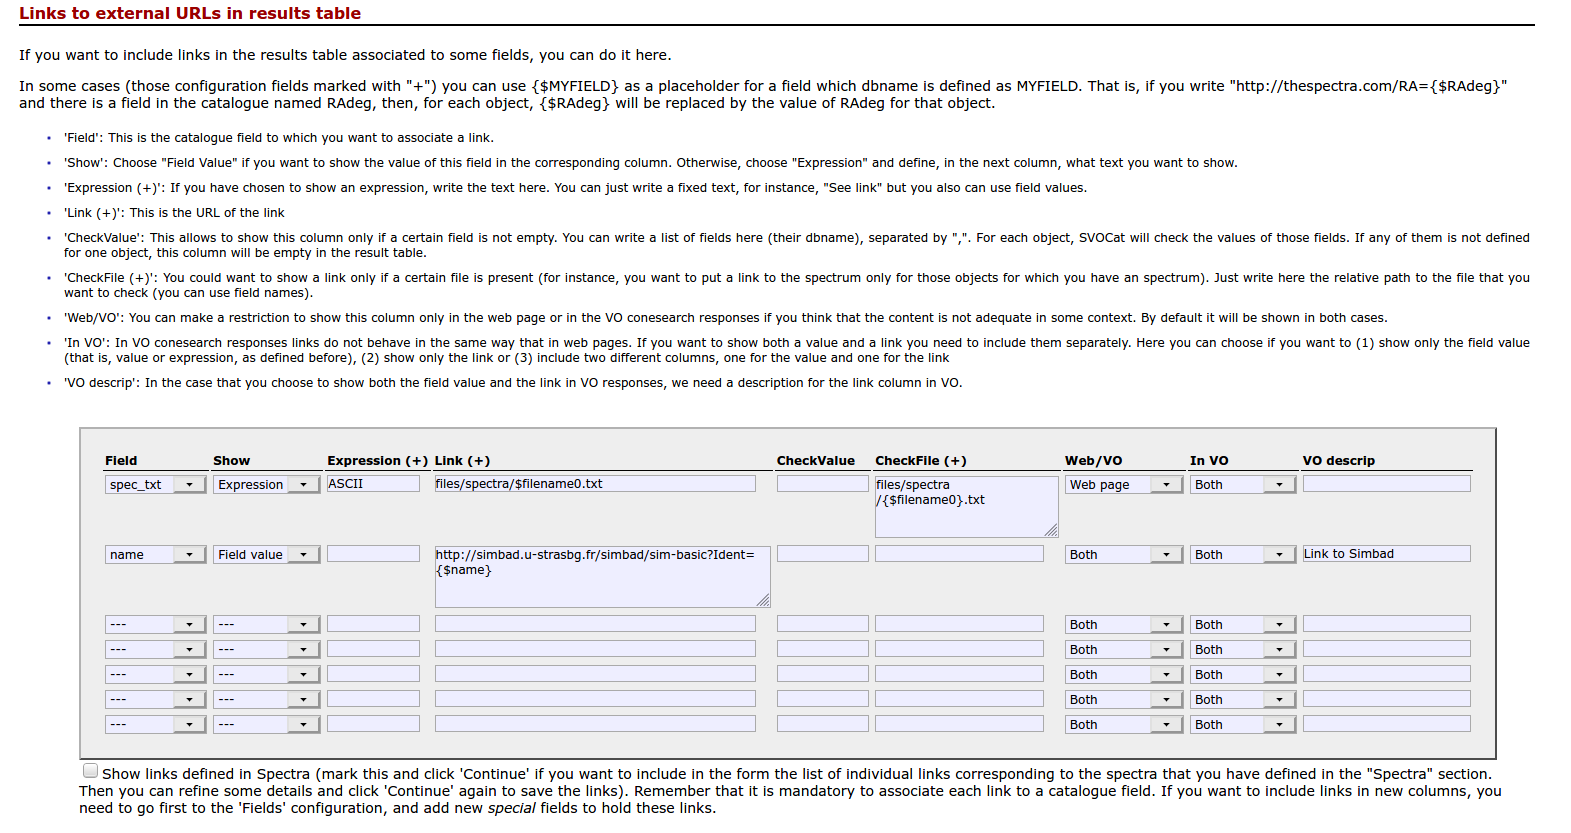
See that you can use, in some configuration options, {$MYFIELD} as a place holder that will be replace with the value of the MYFIELD column for each catalogue entry.
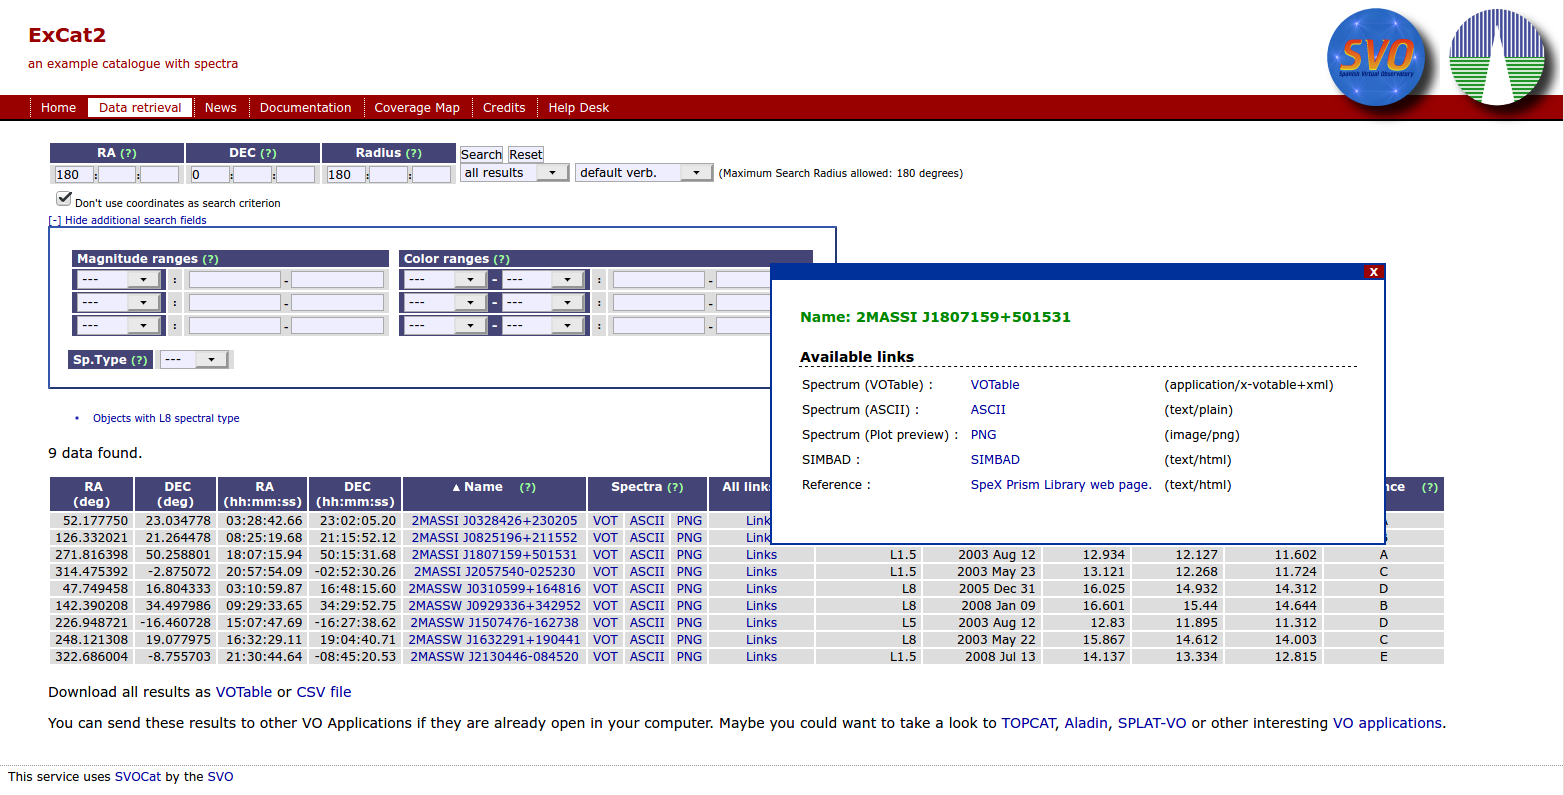
You can also include links that open a windows displaying some content. This is often used to preview some images associated to catalogue entries. But other types of html content could be displayed.
In the case of our example catalogue we include a link that will open a window showing a preview of the object spectrum.
This only applies to the web presentation of the catalogue. That's why in the section above we have included a link to download the plot only in the VO services and we include here the preview of the curve in the web service.
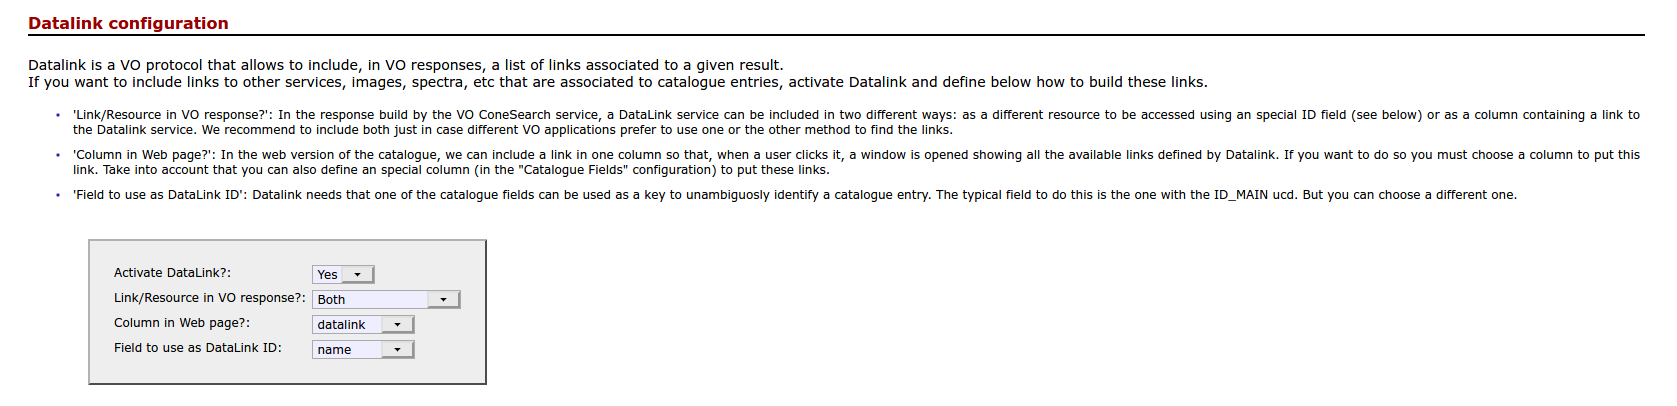
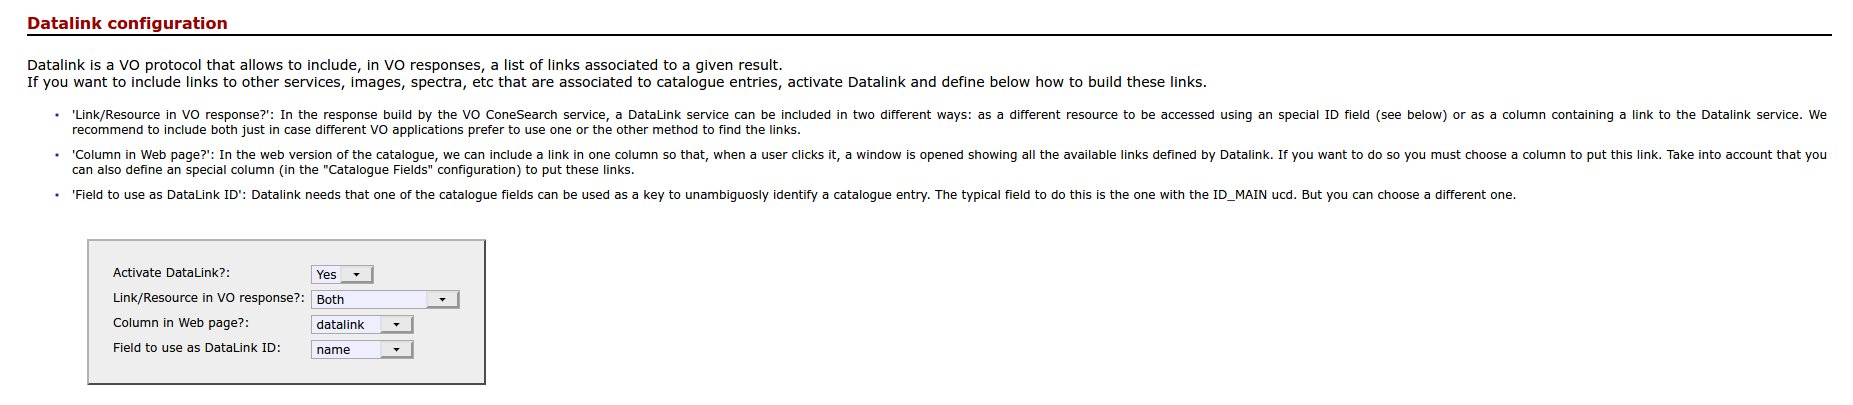
Datalink is a VO protocol designed to associate links to catalogue entries. If you activate it you need to define also a field to be used as Datalink ID. And,below, you will have to define what links you want to show and their properties.
In our example catalogue we have three types of links:
If you have spectra in your catalogue and you have decided to implement a SSAP service, you can configure this links section in a more interesting way.
You include the links to spectra through the SSAP protocol, which is richer and gives more information than just downloading the ascii files.
You include a dataLink protocol with a link associated to the all links columns.
And include all the possible files in the DataLink content.

And finally the catalogue web page will include all the information.
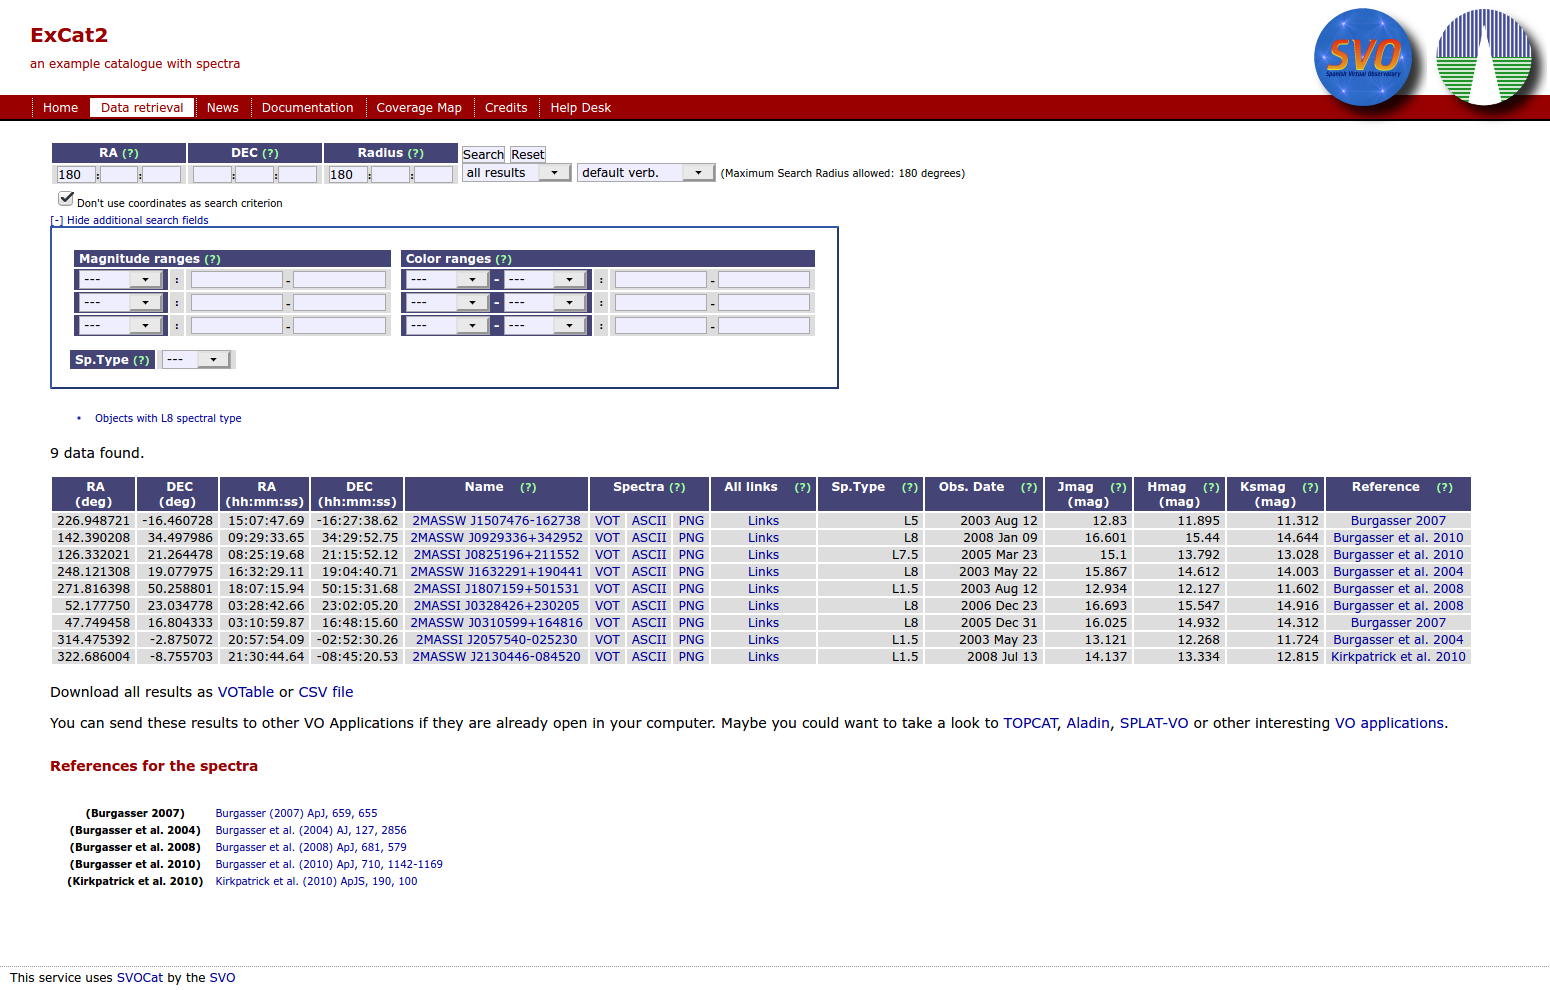
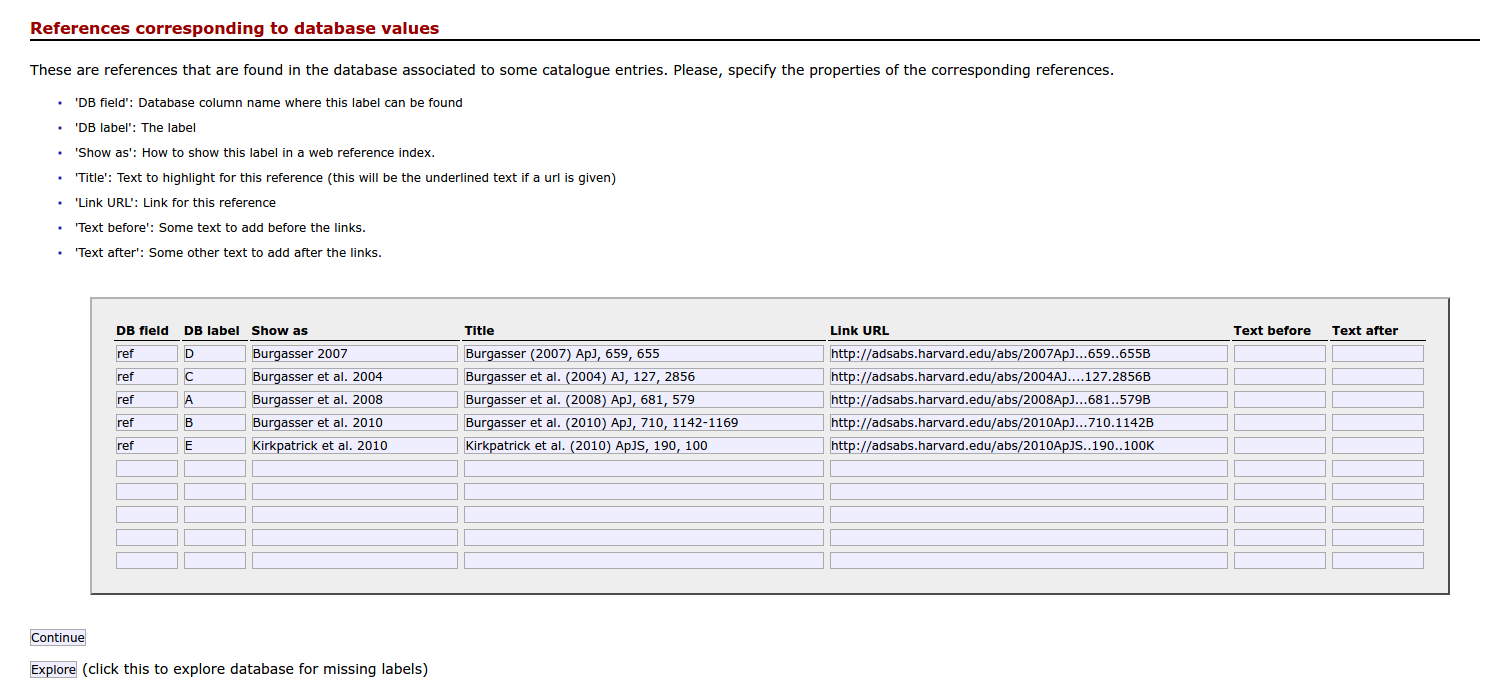
It is quite common that a catalogue contains different references (papers, web pages) for different catalogue entries.
For instance, in our example catalogue, there are references for the origin of the information about the different filters. These references are included in our database as simple labels separated by commas ("A,C" for instance) and we, of course, want to display this information.
There are two places where references can be displayed:
This configuration option here specifies the behaviour of the links displayed in the results column.
The available options are:
When the 'Direct link to URL' option is chosen, links go directly to the URL specified in the configuration (see below).
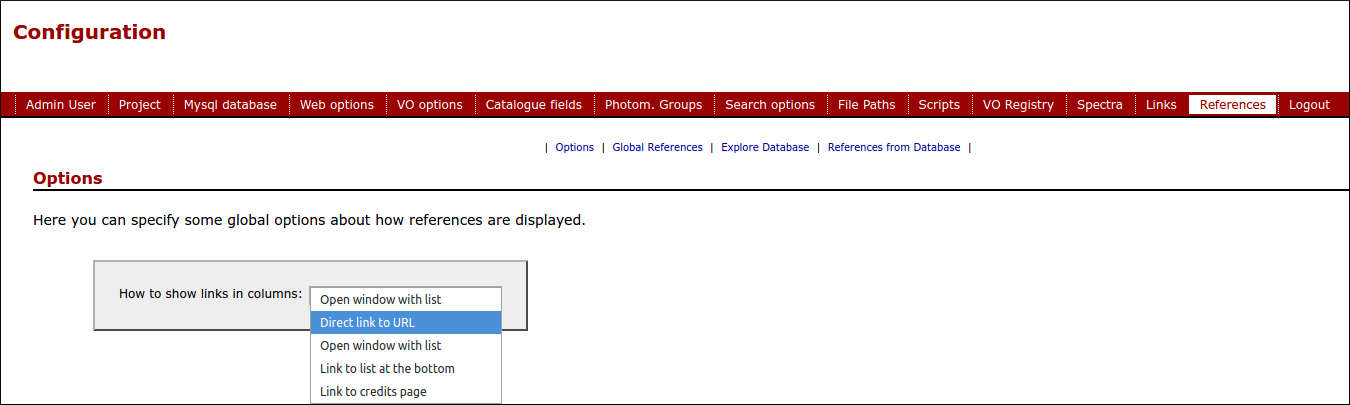
When the 'Open window with list' option is chosen, a small window is opened with the list of references highlighting the clicked one.
When the 'Link to list at the bottom' is chosen, the list of references is included at the bottom of the page, and links will go to that list.
When the 'Link to credits page' is chosen, the links will open the 'Credits' page, where the list of references are displayed.
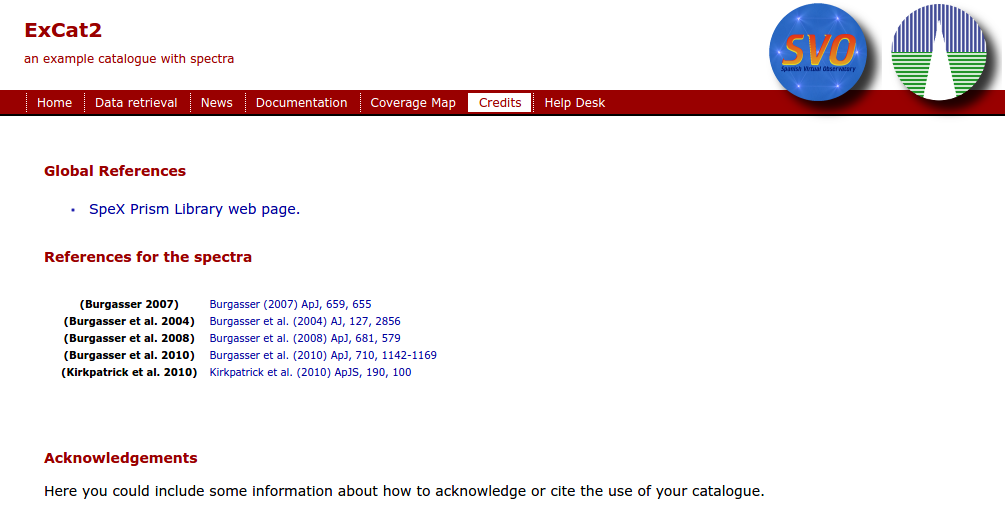
Global references are those that you want to display as general references for your service. They will be displayed in the Credits section.
In our example, we include a link to the Spex-Prisma web site.
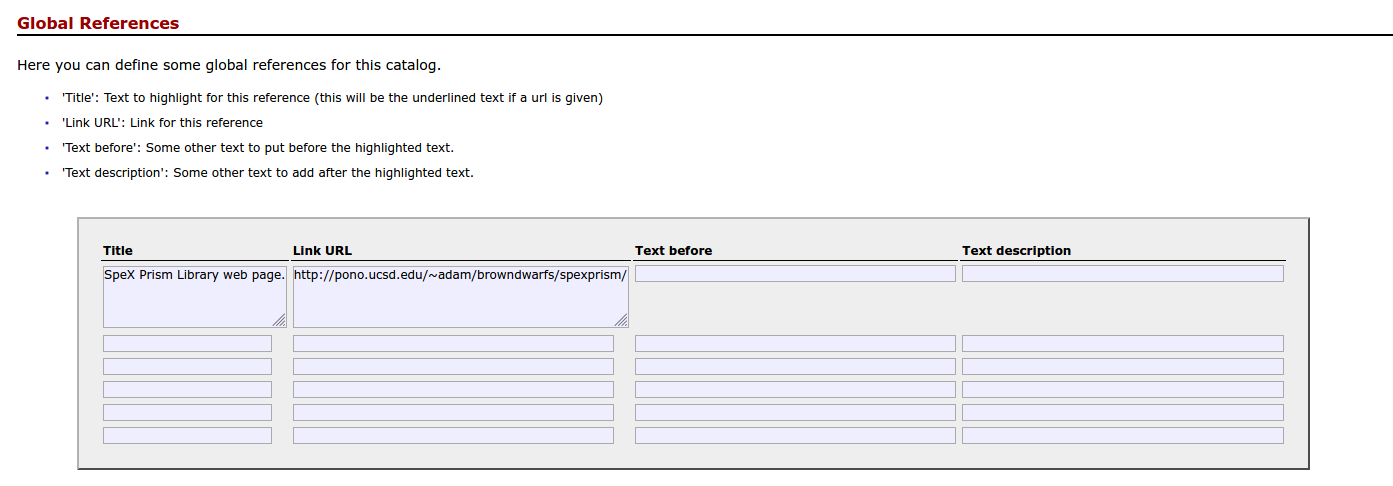
The 'Credits' section will include the global references, those coming from the database and also the aknowledgments that you configure, if any, in the web admin section.
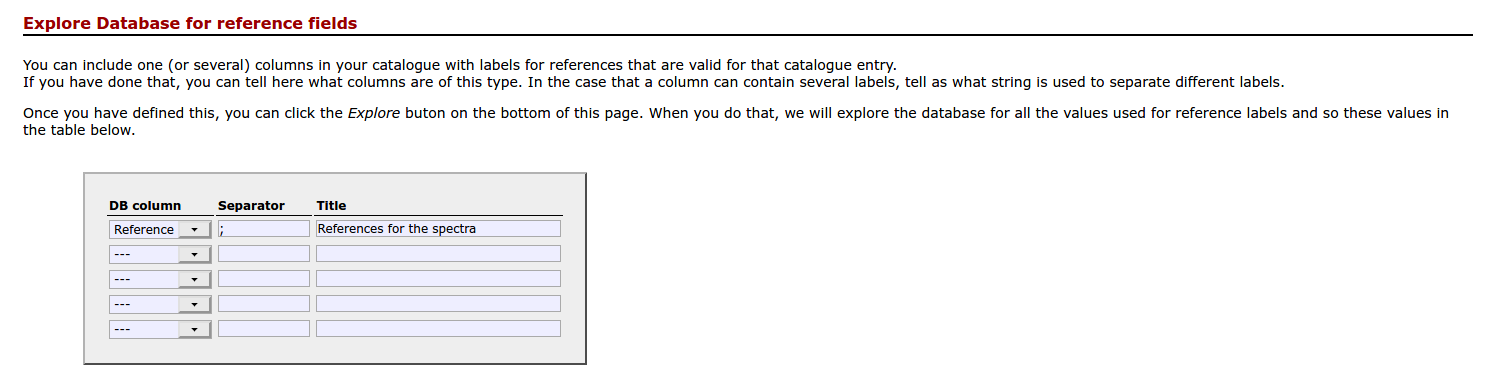
In the typical case you have one or several columns in your database with labels for references to external sources.
You should specify here:
Once that you have saved this information you have the option to click in the "Explore" button below. SVOCat will scan your database for all the different reference labels to offer the list in the form below.
Here you have to specify, for each different reference label:
If you decide to customize the look at feel of your web page, it could be enough to change the style/style.css file.
All the styles used in the public web page are defined here.
If you are used to working with CSS style sheets you will know what to do. If not, you maybe want to learn a little about it (see, for instance, W3C page about style sheets) but, in any case, you could be satisfied changing just the color of some elements in the page, which is quite easy.
If you take a look to style/style.css you will see that it is quite simple (we show here only an schematic structure, look into the real file for the details).
In summary:
If you just want to change some colors in the web page, look in the style/style.css file for color definitions. You will find them as: "color" (for font color), background or background-color (for background color) or in some "border" definitions (for line color).
Colors are specified as things like #abc, it is, a "#" symbol followed by three characters. Those three characters represent a color in RGB format. That means that the first number is the amount of Red, the second the amount of Green and the third the amount of Blue. These amounts are written as hexadecimal numbers (where 0 is minimum and f(16) is maximum). For instance:
You can try some combinations using numbers and letters (a,b,c,d,e,f) and see what you get.
Given that the web page design is simple, I would guess that, if you want to change colors, you will want to change the often used "Red" colors (menus, titles...) to some other color. Let's imagine that you want a mostly white-and-blue design instead white-and-red. You will want to change:
and we get a more bluish look:
 |
 |
In the file style/header.php we define everything that is to be shown before the main content. That is: header (title, subtitle), logos and menu.
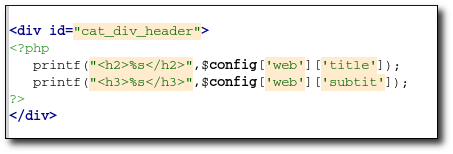 |
First we show the "cat_div_header" layer (with title and subtitle). |
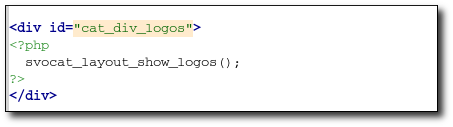 |
Then we show the "cat_div_logos" layer (with the logos). In practice this is generated by an special function using the configuration that you set in the administration tool. You probably don't want to change anything here. |
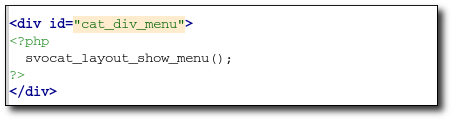 |
Then the "cat_div_menu" layer (with the menu). In practice this is generated by an special function using the configuration that you set in the administration tool. You probably don't want to change anything here. |
 |
Finally we start the "cat_div_main" layer where the main content will be displayed. This layer will be closed later in the style/footer.php file. |
One possible change that you could want to make here is changing the text title and subtitle on the top-left corner by some image. If this is the case you could do as follow:
|
⇒ |  |
and you will get the fancy image as title:

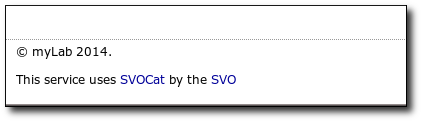
The file footer.php makes the actions that must be performed at the end of the page (after showing the main content)

But you could want to add your own text:
and you get the new footer:
 |
⇒ |  |
Or even drop the SVOCat line (if you do so, please send us a note saying that you are using the application so that we know it and we can see that our work is being useful for somebody).
There are some important operations that you have to do outside SVOCat, although SVOCat will help to display results (as for MOC files) or can help to easy the operation (as for the registry case).
Here we give you some tips with the hope of helping you with these operations.
SVOCat does not automatically generate the files necessary to display the coverage of you catalogue. You need to generate these files by yourself, include them in the configuration and, then, SVOCat will display them.
Here we give some tips on how to generate the corresponding files.
If you want to generate the files to show a coverage map for your catalogue, we recommend to do it as follows:
Save your file as myvotable.xml


